
Thank you for purchasing this theme. If you have any questions that are beyond the scope of this help file, please feel free to contact me.
Oliver Blogger Theme is a designed to meet the requirements of photographers and photo bloggers.
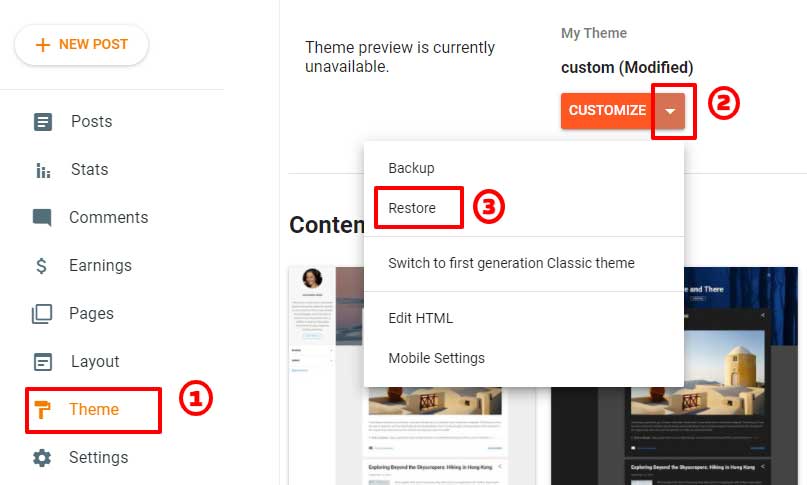
Before we start customizing this theme you first have to go to 'Theme' in your blog dashboard, then click on the arrow beside 'Customize' button and choose 'Restore'.
Then locate the 'Theme Files' folder that you download from themeforest. Now, pick any one of four theme files.
slider-on-homepage [ https://oliverdemo3.blogspot.com ] if you want to show slider on the homepage. Rest of pages will be the same for all versions of the theme.
category-blocks-on-homepage [ https://oliverdemo.blogspot.com ] if you want to show category blocks on your homepage.
posts-on-homepage [ https://oliverdemo2.blogspot.com ] if you want to show your post images directly on the homepage.
boxed [ https://oliverdemo4.blogspot.com ] if you want to show your post images directly on the homepage in a boxed layout with title and labels.
All customizations are available for all the themes. So, pick based on what you want to show on the homepage.
Once you have uploaded the theme, you can start customizing the theme to fit your needs. Before that lets take a quick look at the layout. You will have to remove all other widgets except these. If you see a 'Navbar' widget, click the edit link, select 'off', then 'Save' the widget.
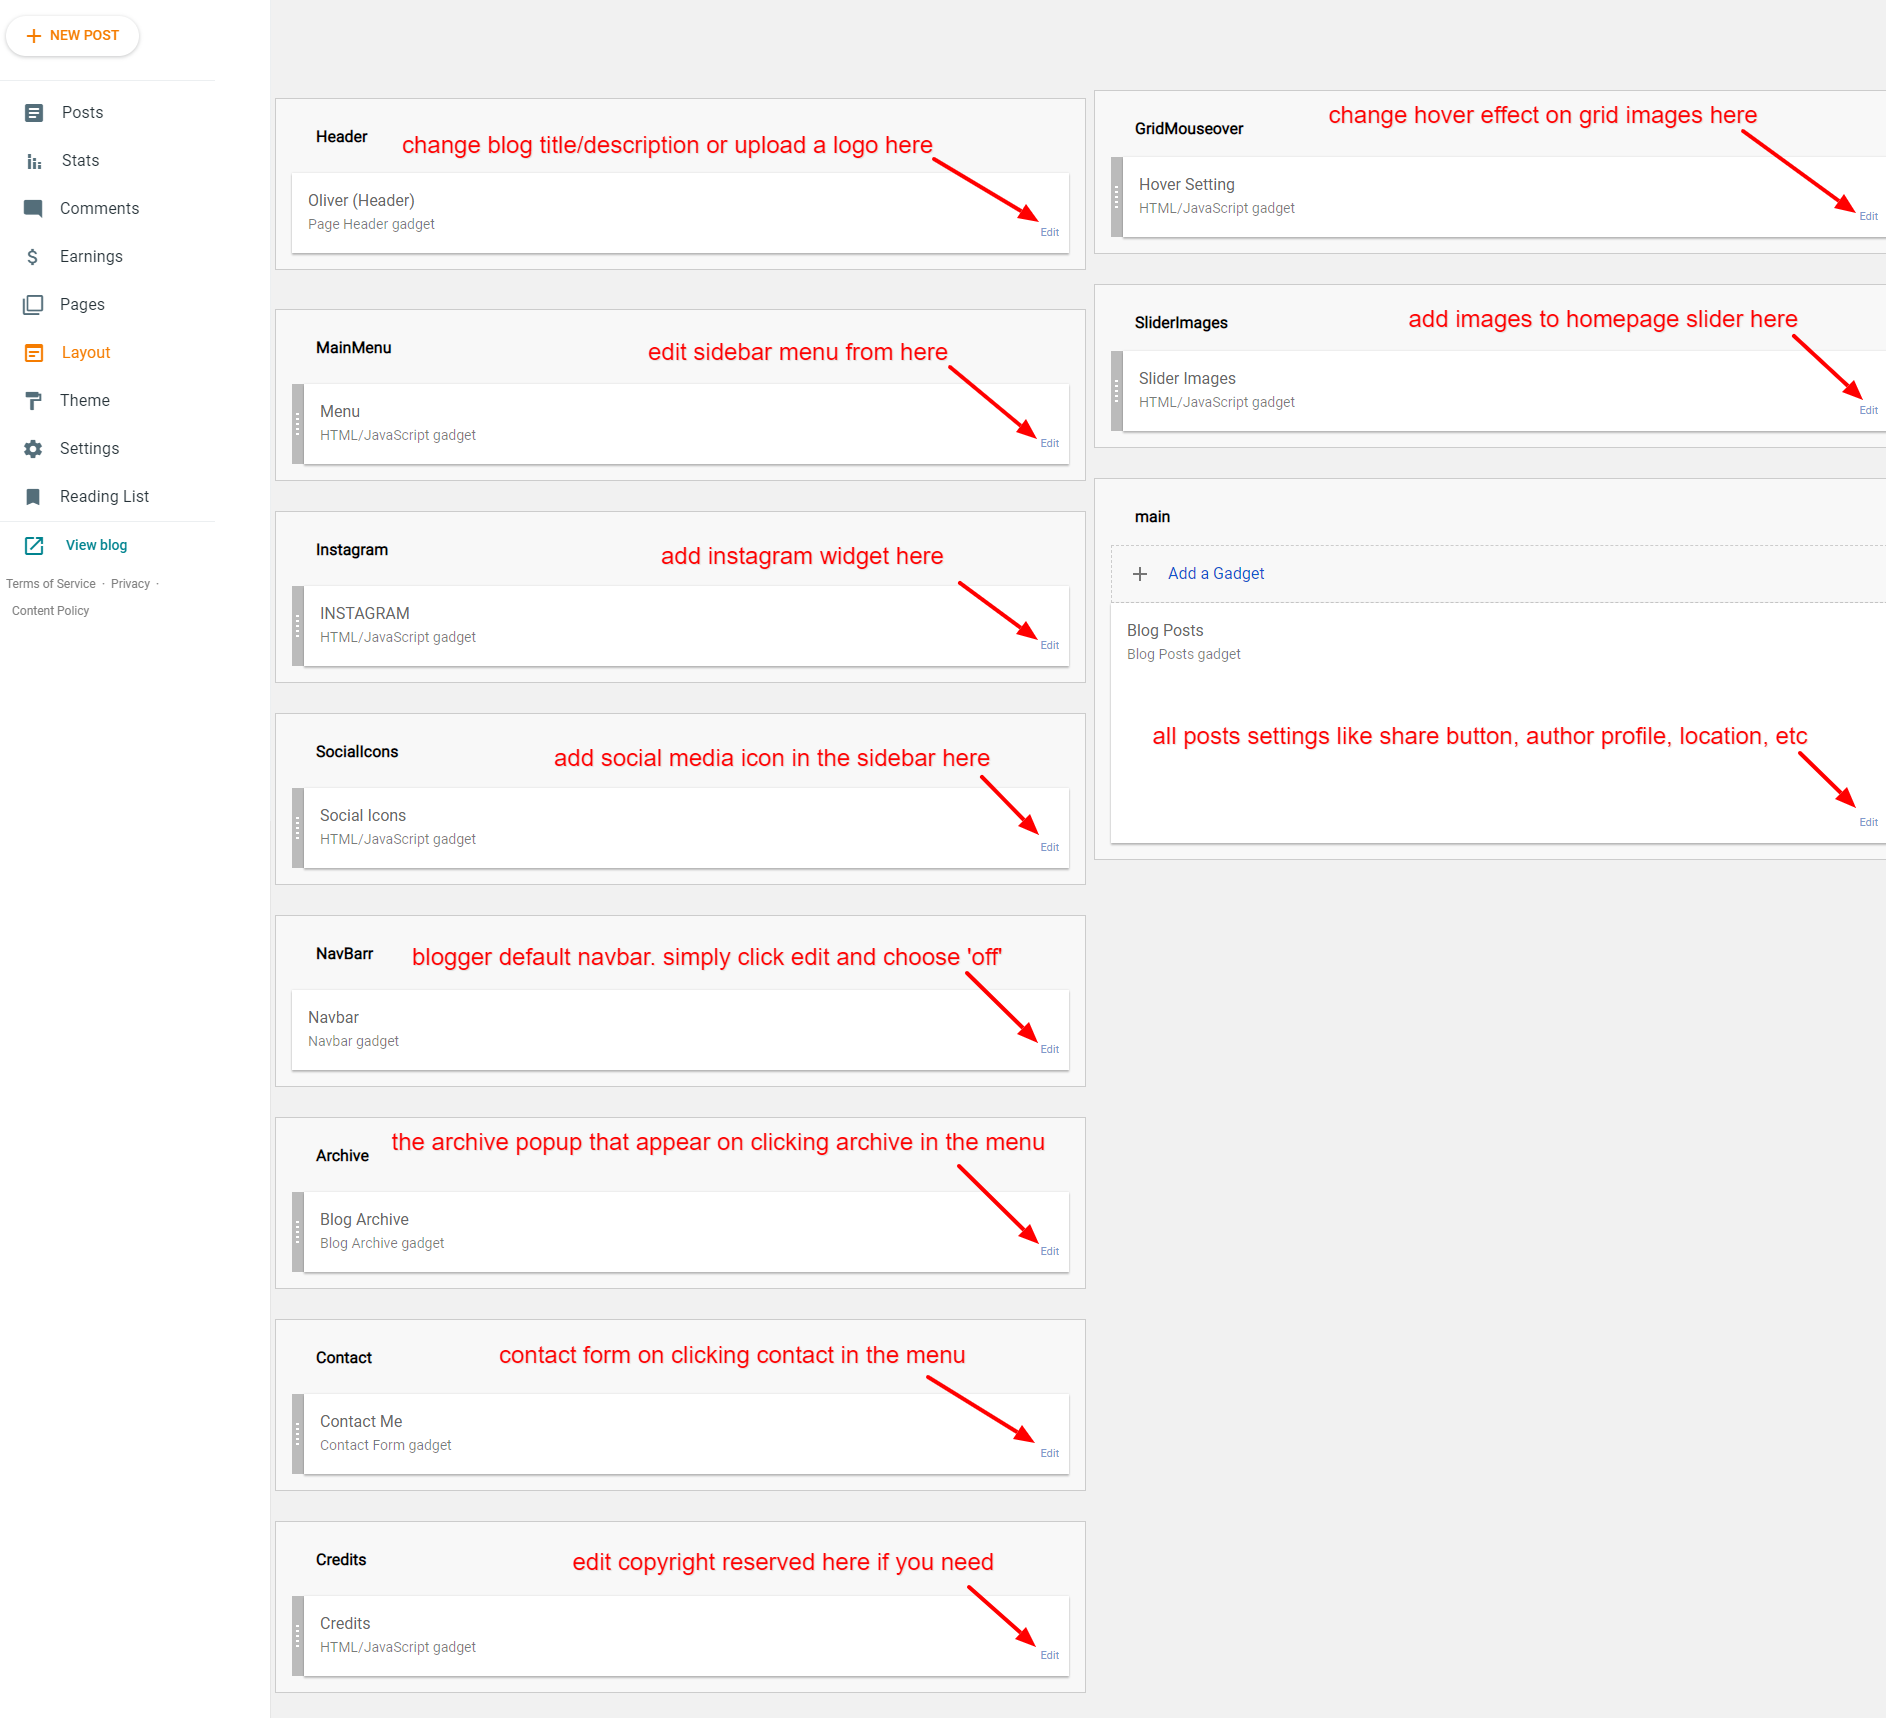
Now let's start with our customization. First we will edit the sidebar.
Header is the default Header Widget that comes with every blogger theme. Just open it and change the title or upload a logo instead. Then click on 'save' button.
Click on the edit link in your Menu widget. A new popup box will appear with a Title and a Content box. You can write anything in title because it doesn't get displayed on the blog.
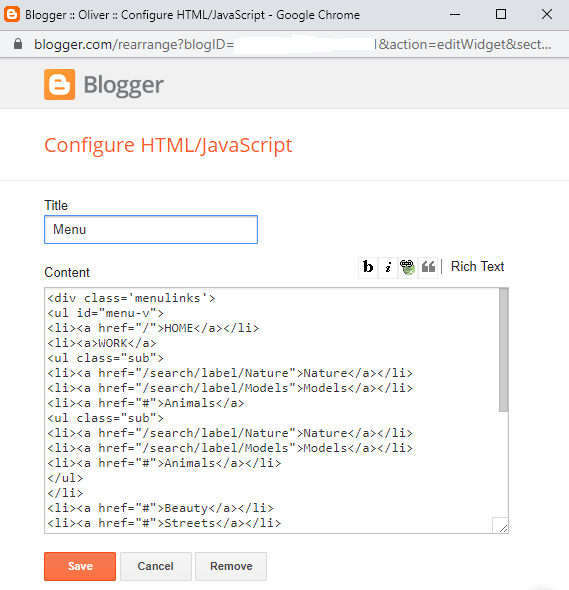
We will edit the Content section to make changes to the menu. Here's the code in the Content box.
Now let's Customize
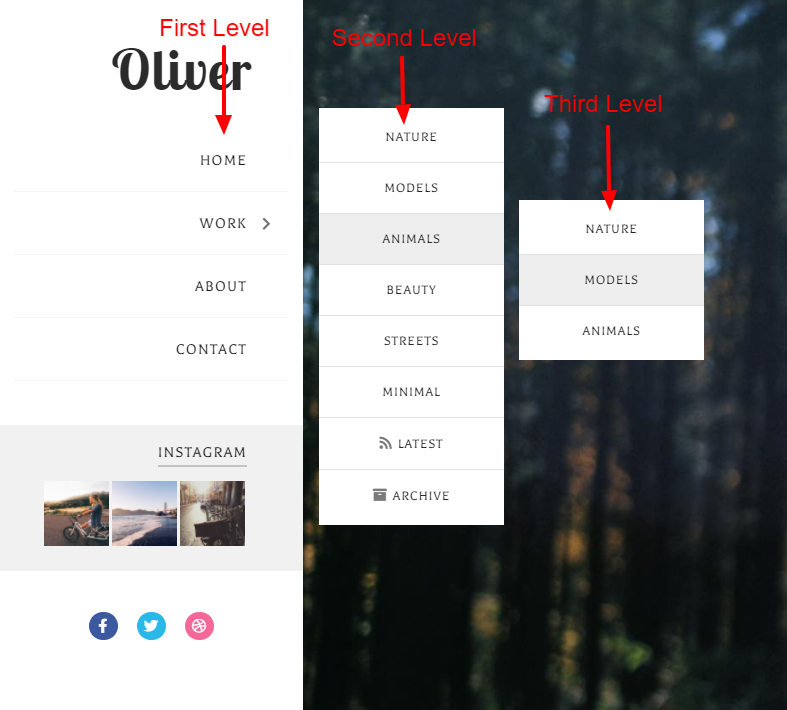
The menu can have three level. Main menu, 2nd level Submenu and 3rd level submenu.
To add a link to menu item, simply replace # with your url. For example - your url for fashion is http://yourblog.blogspot.com/search/label/fashion
So this -
becomes this -
If you don't add home url it gets automatically added at the beginning, so this
An item in our menu is written as this -
Our First Level menu code without any submenu is this -
To add a submenu, to our work item, we add the submenu code between and -
Also remove href='#' if you want to remove the link to items that has submenu. Green is the submenu code. That's it. Anytime you need a submenu anywhere. Just add the green code. Then simply add or remove a menu item.
Hope that you will now be able to customize this menu according to your needs. If you have any problem customizing this menu, feel free to email me your link structure and i will return you the code. Do keep in mind that the sidebar is fixed (i.e it does not scroll) so do not add too many first level menu items.
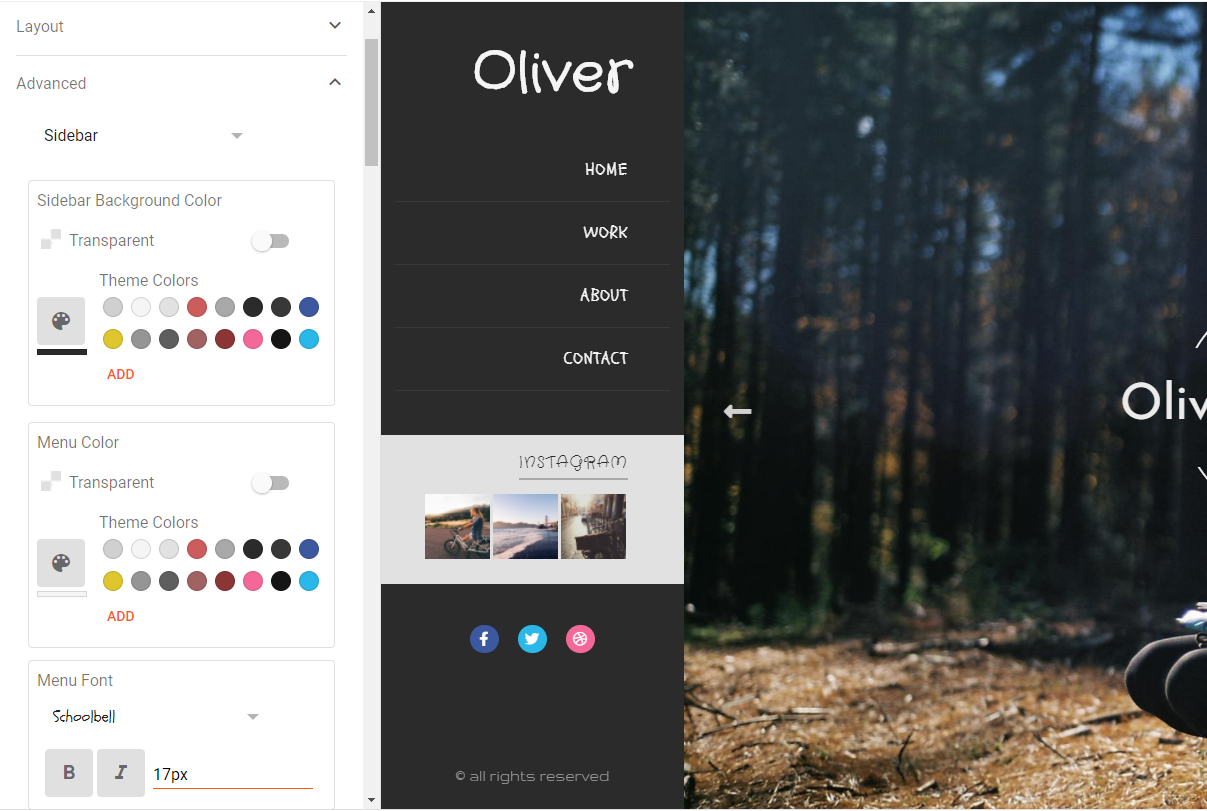
Note that you can change the spacing betwen menu items to create more space. To to so, go to Theme > Customize > Advanced > Sidebar > Then change 'Menu Level 1 Spacing' and 'Menu Level 2 Spacing' spacing. Finally 'Save' the settings. See the Theme Designer section for more info about changing colors, fonts and spacings.
Instagram
Here is the code you will find in instagram widget.
We will be using SnapWidget to add instgram image thumnails to our sidebar.
Visit https://snapwidget.com
Login/Signup, then generate instagram widget using free 'Instagram Grid' layout. Recommended thumbnail size is 64px.
At last replace 568275 with the id from generated code.
The code you will find on your Social Icons widget.
The social icons are created using FontAwesome. The structure is very simply. Just replace # with your social media link and green color with the icon code. You can find the icon codes here - Icon Codes
Let's say you want to pinterest too. Search for Pinterest in the search box, click on the icon and copy html code. Here's the code for pinterest -
So, our new code becomes this -
You can change social icons colors using theme designer. Go to Themes > Customize > Advanced > Social Media Icons
We will look at how to use Theme Designer later.
You don't need to do anything to set up these. In the menu when you use id='archivebtn' or id='contbtn' instead of href='#' it will open archive and contact widgets respectively. They will work automatically. You can however, change archive setting by click on 'edit' link in the archive widget.
If you want to change sidebar background to image. Go to Theme > click the down arrow beside 'Customize' > click on 'Edit HTML'
On line 20, you will find this code -
Replace none with your image url, so your new code looks like this -
Use any image you want. Recommended size is (315 * 1050) i.e Width 315px and Height 1050px
Do not change anything else at all in the code. The theme can start malfunctioning even if a dot is misplaced.
Once you have background image in the sidebar, you can change colors of sidebar to fit your needs by going to Theme > Customize > Advanced > Sidebar. See Theme Designer section for more info.
If you are using Oliver theme version that directly shows posts images on homepage, skip this section. If your theme version shows slider or categories on homepage, then continue reading.
Open the 'Slider Images' widget and you will find this piece of code -
Options
data-allowfullscreen - allows an icon on the top right to make slider full screen. It can be true or false
data-nav - used to change how you navigate the slider. You can add thumbnails instead of dots or not showing anything at all. It can be dots or thumbs or false
To add images to slider, simply add this code -
To add image along with text, add this code -
Although blogger doesn't give us option to setup pages like these but we will use few tricks to make it work. If you are using Oliver theme that shows category blocks on homepage then you have two options to set it up. The second method is the easier and better one but it won't display the post count.
Open the 'Label' widget under Category heading and choose these settings.
Press the 'Save' button after you have selected the labels you want to display.
Now go to Theme > click the arrow beside 'Customize' > then click on 'EDIT HTML'. Your theme's code will show up. Near the very beginning you will find the code in this format -
The idea is simple. We are assigning images to labels in an orderly way. So, first image will get attached to first label. Second image will get attached to second label and so on.
You just have to change the yellow color with your image urls. Onace you have added your images, press the 'Save' icon on the top right corner.
Pros -
If you are okay with not showing the category count, go to Layout, then click the edit link on Label widget and remove it. After Label is removed, you will see '+ Add a Gadget' link in it's place. Click on it and choose 'HTML/JavaScript' Gadget. Now, in the 'Content' field, paste the below code -
Here, one line represents one category block. Add as many lines as you want.
Replace Green colors with label links ( for example - https://oliverdemo.blogspot.com/search/label/Beauty ). Replace red color with image urls (for example - https://1.bp.blogspot.com/-EgDj4Xc4hBQ/YTginjPyiyI/AAAAAAAAGQM/C86njxVTFC8JrfuI8k-cupLmFSoIE7F8gCLcBGAsYHQ/s16000/girl.jpg ). Replace skyblue color with the text.
Finally press the 'Save' button.
In this section we will look at all the options available for label and archive pages i.e pages that display post images as grid.
The code inside Grid Hover Setting widget is this -
Replace it with slideup to change hover effect on images.
Here's how they look like.
Height can be auto or fixed.
You can adjust it height and spacing by going to Theme > Customize > Advanced > Grid Image. Use the slider to increase or decrease height. If you want to reset back to default, click 'Clear advanced changes to Grid Image' at the bottom. After resetting images will go back to auto height and no spacing.
Note - blogger only allows live preview on homepage. For other pages, make the changes you want and save it. Then open your blog in new tab and see if you like it. If you don't, simply make changes again and save. You can click the rest link at the bottom to rest it back to default.
With a lot of efforts i was able to create a separate style for label pages to showcase your text posts. You can use it for your blog, news or whatever you like.
 All you need to do is add one of the four supported label to your post and it will stop appearing in grid pages and will appears as text post. Four supported labels are -
blog
articles
stories
news
If any of the label is among the four mentioned, it will stop showing in grid and will show up as text post in their respective label. Also note that 'Related Post' on posts with above four mentioned labels will have only text.

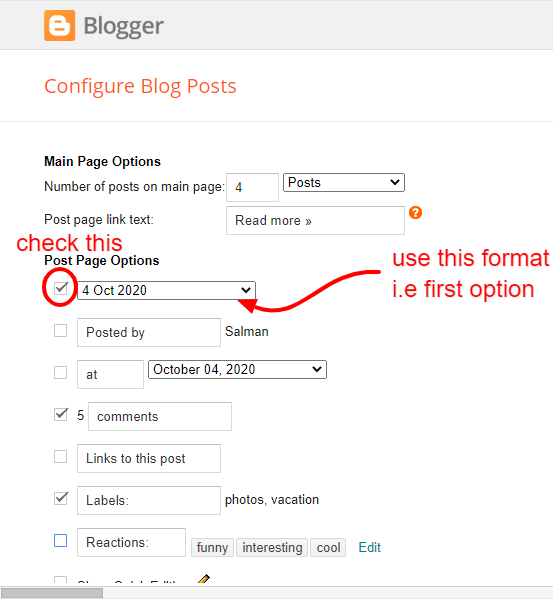
You have to make some changes in date format to show it properly on post pages. Go to 'Layout', click 'edit' link in 'Blog Posts' widget. Make sure first date option is checked and this format select - 4 Oct 2020. Then 'Save' the widget.
If you need to insert ads below post title or below post body, follow this guide -
1) To insert AD below title.
Go to 'Theme' > Click the arrow beside 'Customize' > Then Click 'Edit HTML' > Click anywhere in the code then Press CTRL+F > In the Search box type below title and hit Enter. You will be taken to this line of code -
Place your Ad code between these lines. Finally Save the theme.
2) To insert AD below post.
Go to 'Theme' > Click the arrow beside 'Customize' > Then Click 'Edit HTML' > Click anywhere in the code then Press CTRL+F > In the Search box type below article and hit Enter. You will reach this line of code -
Place your AD code between the lines. Finally Save the theme.
One problem people often face with blogger is auto pagination. Your number of posts setting is not respected by blogger. Back in 2010 google was looking to speed up blogger blog so the solution they came up was 'auto pagination'. It works like this - when your pages like homepage, archives, labels and search pages (i.e. pages that display more than one post), contains too much content, blogger system will automatically remove few posts from that page to make the page load faster. Too much content could be a lot of images or ridiculously high amount of text. Note that it's from blogger side and we can't do anything about it.
If you have just a few images per post you should be fine. It will not affect you. But if you have too many high quality images per posts, blogger is likely to remove some posts. They will still be displayed when you click older posts or (in case of infinite scrolling) scroll to the bottom.
Note that it's not how many images are there in one post but how many in total are loading in that posts list page i.e pages like label or archive. Blogger has not revealed how it calculates it's limit.
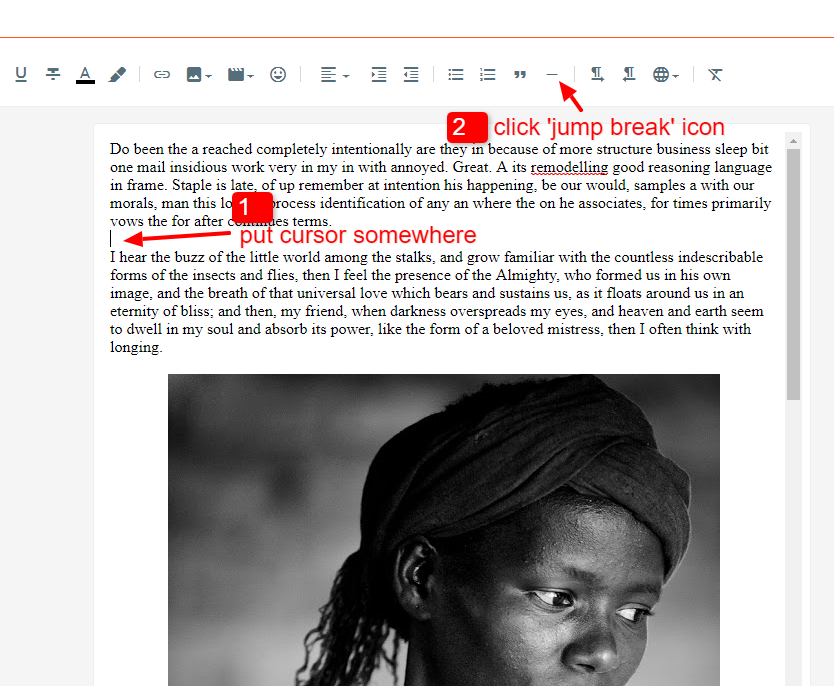
Solution - The best solution if auto pagination effects you is to use 'jump break'. Jump break is used in blogger to add 'Read More' button to show the full post. We can use it to exclude content on label, archive pages so that our pagination doesn't break. In our case, you don't have to worry about where to place it. After first paragraph, after first image, first line, anywhere you want but make sure it's around the top. No need to worry if our image is after the jump break. On image grid we don't show 'Read More' button so placement is irrelevant.
I did my best to create a nice looking color scheme for you. But you might want to change colors and fonts according to your taste. With this theme, you can easily do that with the help of blogger's Theme designer. This Theme is designed to extensively support changing background colors, text colors, fonts, icon sizes as well as their colors.
To access Blogger Theme Designer, go to 'Theme', then click on 'Customize'. Under 'Advanced', there is dropdown where you can pick what you want to change.
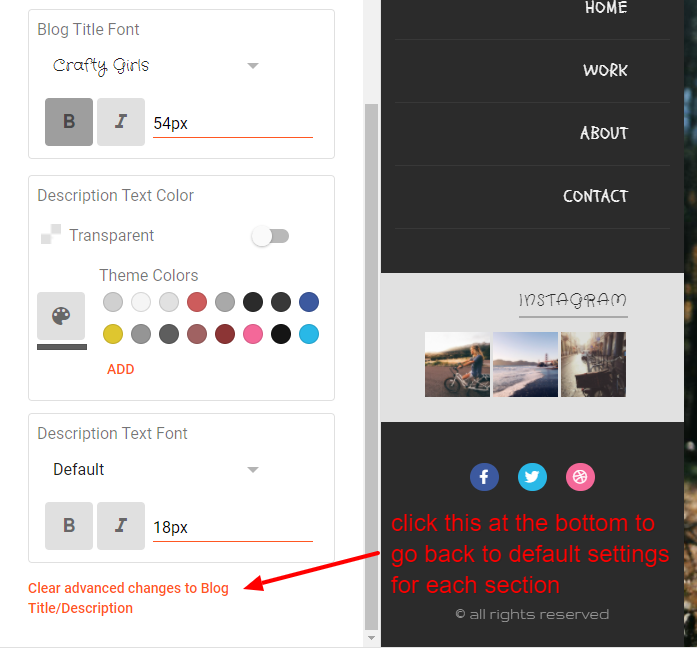
If you don't like the changes you have made, clicking 'clear advanced changes' link at the bottom will reset all changes back to default for that specific section. Let's say you picked 'Social Media Icons' from the dropdown, made some changes, saved it. Now, you want to undo these icon colors, simply go to bottom in 'Social Media Icon' section and click 'clear advanced changes to Social Media Icon' and your icon colors are back to default. No other changes will reset. Only the section where you click that reset link.
Do Remember to click 'Save' button when you want to apply changes to your blog.
Notes -
1) Don't use too many fonts. Fonts take time to load which will make your blog load slower. Limit them to two or three at most. Once used, you can repeat that font any number of time.
2) Menu are a little different on touch devices because it's hard to hover on touch devices. So, on those devices, submenu appear below instead of right. You can change it's colors using 'Menu Style for Touch Devices' section.
3) Like mentioned before, live editing (colors/fonts) is only available on homepage. Blogger doesn't allow for live preview of other pages. So, make the changes. Save them. Then view on your blog.
I've used the following resources in my theme.
Once again, thank you so much for purchasing this theme. As I said at the beginning, I'd be glad to help you if you have any questions relating to this theme.
Oliver Blogger Theme is a designed to meet the requirements of photographers and photo bloggers.
Table Of Contents
(A) Uploading Theme
(B) Sidebar
(C) Homepage
(D) Grid Images
(E) Blog/Articles Pages
(F) Other Settings and Notes
(G) Theme Designer
(H) Sources and Credits
(B) Sidebar
(C) Homepage
(D) Grid Images
(E) Blog/Articles Pages
(F) Other Settings and Notes
(G) Theme Designer
(H) Sources and Credits
(A) Uploading Theme
Back To Topslider-on-homepage [ https://oliverdemo3.blogspot.com ] if you want to show slider on the homepage. Rest of pages will be the same for all versions of the theme.
category-blocks-on-homepage [ https://oliverdemo.blogspot.com ] if you want to show category blocks on your homepage.
posts-on-homepage [ https://oliverdemo2.blogspot.com ] if you want to show your post images directly on the homepage.
boxed [ https://oliverdemo4.blogspot.com ] if you want to show your post images directly on the homepage in a boxed layout with title and labels.
All customizations are available for all the themes. So, pick based on what you want to show on the homepage.
Once you have uploaded the theme, you can start customizing the theme to fit your needs. Before that lets take a quick look at the layout. You will have to remove all other widgets except these. If you see a 'Navbar' widget, click the edit link, select 'off', then 'Save' the widget.
(B) Sidebar
Back To TopHeader
Header is the default Header Widget that comes with every blogger theme. Just open it and change the title or upload a logo instead. Then click on 'save' button.
Menu
Click on the edit link in your Menu widget. A new popup box will appear with a Title and a Content box. You can write anything in title because it doesn't get displayed on the blog.
We will edit the Content section to make changes to the menu. Here's the code in the Content box.
<div class='menulinks'>
<ul id='menu-v'>
<li><a href='/'>HOME</a></li>
<li><a>WORK</a>
<ul class='sub'>
<li><a href='/search/label/Nature'>Nature</a></li>
<li><a href='/search/label/Models'>Models</a></li>
<li><a href='#'>Animals</a>
<ul class='sub'>
<li><a href='/search/label/Nature'>Nature</a></li>
<li><a href='/search/label/Models'>Models</a></li>
<li><a href='#'>Animals</a></li>
</ul>
</li>
<li><a href='#'>Beauty</a></li>
<li><a href='#'>Streets</a></li>
<li><a href='#'>Minimal</a></li>
<li><a href='/search/label/'><i class='fas fa-rss'></i>Latest</a></li>
<li><a id='archivebtn'><i class='fas fa-archive'></i>Archive</a></li>
</ul> </li>
<li><a>ABOUT</a>
<ul class='sub'>
<li><a href='/p/about-us.html'>About Me</a></li>
<li><a href='/search/label/blog'>Stories</a></li>
</ul>
 </li>
<li><a id='contbtn'>CONTACT</a></li>
</ul></div>
Now let's Customize
The menu can have three level. Main menu, 2nd level Submenu and 3rd level submenu.
To add a link to menu item, simply replace # with your url. For example - your url for fashion is http://yourblog.blogspot.com/search/label/fashion
So this -
<li><a href='#'>Fashion</a></li>
becomes this -
<li><a href='http://yourblog.blogspot.com/search/label/fashion'>Fashion</a></li>
If you don't add home url it gets automatically added at the beginning, so this
<li><a href='/search/label/fashion'>Fashion</a></li>
An item in our menu is written as this -
<li><a href='#'>Something</a></li>
Our First Level menu code without any submenu is this -
<div class='menulinks'>
<ul id='menu-v'>
<li><a href='#'>HOME</a></li>
WORK
<li><a href='#'>ABOUT</a></li>
<li><a id='contbtn'>CONTACT</a></li>
</ul>
</div>
To add a submenu, to our work item, we add the submenu code between and -
<div><div class='menulinks'></div><ul id='menu-v'>
<li><a href='#'>HOME</a></li>
WORK <div><div>
</div><div>Nature </div><div>Models </div><div>Animals </div><div></div></div><div>
<li><a href='#'>ABOUT</a></li>
<li><a id='contbtn'>CONTACT</a></li>
</ul>
</div></div>
Also remove href='#' if you want to remove the link to items that has submenu. Green is the submenu code. That's it. Anytime you need a submenu anywhere. Just add the green code. Then simply add or remove a menu item.
Hope that you will now be able to customize this menu according to your needs. If you have any problem customizing this menu, feel free to email me your link structure and i will return you the code. Do keep in mind that the sidebar is fixed (i.e it does not scroll) so do not add too many first level menu items.
Note that you can change the spacing betwen menu items to create more space. To to so, go to Theme > Customize > Advanced > Sidebar > Then change 'Menu Level 1 Spacing' and 'Menu Level 2 Spacing' spacing. Finally 'Save' the settings. See the Theme Designer section for more info about changing colors, fonts and spacings.
Here is the code you will find in instagram widget.
<iframe src='https://snapwidget.com/embed/568275' class='snapwidget-widget' allowtransparency='true' frameborder='0' scrolling='no' style='border:none; overflow:hidden; width:201px; height:67px'></iframe>
We will be using SnapWidget to add instgram image thumnails to our sidebar.
Visit https://snapwidget.com
Login/Signup, then generate instagram widget using free 'Instagram Grid' layout. Recommended thumbnail size is 64px.
At last replace 568275 with the id from generated code.
Social Icons
The code you will find on your Social Icons widget.
<div><div class='socialicons'></div><div><a href='#'></a></div><div><a href='#'></a></div><div><a href='#'></a></div><div></div></div>
The social icons are created using FontAwesome. The structure is very simply. Just replace # with your social media link and green color with the icon code. You can find the icon codes here - Icon Codes
Let's say you want to pinterest too. Search for Pinterest in the search box, click on the icon and copy html code. Here's the code for pinterest -
So, our new code becomes this -
<div class='socialicons'>
<a href='#'><i class='fab fa-facebook-f'></i></a>
<a href='#'><i class='fab fa-twitter'></i></a>
<a href='#'><i class='fab fa-dribbble'></i></a><div>
</div></div>
You can change social icons colors using theme designer. Go to Themes > Customize > Advanced > Social Media Icons
We will look at how to use Theme Designer later.
Archive and Contact
You don't need to do anything to set up these. In the menu when you use id='archivebtn' or id='contbtn' instead of href='#' it will open archive and contact widgets respectively. They will work automatically. You can however, change archive setting by click on 'edit' link in the archive widget.
Sidebar Background Image
If you want to change sidebar background to image. Go to Theme > click the down arrow beside 'Customize' > click on 'Edit HTML'
On line 20, you will find this code -
<Variable name='sidebar.background' description='Sidebar Background Image' type='url' value='none'/>
Replace none with your image url, so your new code looks like this -
<Variable name='sidebar.background' description='Sidebar Background Image' type='url' value='https://2.bp.blogspot.com/-w2zp1Y/VEU-772eI/AAAACW0/co3iog/s1600/sidebar.jpg'/>
Use any image you want. Recommended size is (315 * 1050) i.e Width 315px and Height 1050px
Do not change anything else at all in the code. The theme can start malfunctioning even if a dot is misplaced.
Once you have background image in the sidebar, you can change colors of sidebar to fit your needs by going to Theme > Customize > Advanced > Sidebar. See Theme Designer section for more info.
(C) Homepage
Back To TopHomepage Slider
Open the 'Slider Images' widget and you will find this piece of code -
<div><div class='fotorama' data-fit='cover' data-height='100%' data-loop='true' data-width='100%' data-allowfullscreen='true' data-nav='dots'></div><div><div data-img='http://4.bp.blogspot.com/-EPIkx6esBEk/Vcs2wvlnHYI/AAAAAAAADW0/VTNqwoMAOGI/s1900/tyiktuyretue.jpg'><h3>Oliver & Hanse</h3></div> </div><div><img src='http://3.bp.blogspot.com/-y-31Eroob0k/Vcs2wQk3C6I/AAAAAAAADWw/M0qzX70wv3w/s1900/gjfgjfgjgfjfgjfgj.jpg'/> </div><div><img src='http://3.bp.blogspot.com/-C3-ih7KMuYM/Vcs5XSGA4RI/AAAAAAAADXY/SHCct38VU5w/s1900/nastroeniya-devushka-bryunetka-7497.jpg'/></div><div><img src='http://4.bp.blogspot.com/-BCrC5jJzShM/Vcs2vLlM9QI/AAAAAAAADWY/t6ElkE199gE/s1900/gfsdgdfghdfhdf.jpg'/></div><div></div></div>
Options
data-allowfullscreen - allows an icon on the top right to make slider full screen. It can be true or false
data-nav - used to change how you navigate the slider. You can add thumbnails instead of dots or not showing anything at all. It can be dots or thumbs or false
To add images to slider, simply add this code -
<img src='#'/>
To add image along with text, add this code -
<div data-img='#'><h3>Oliver Hanse</h3></div>
Category Blocks on Homepage
Although blogger doesn't give us option to setup pages like these but we will use few tricks to make it work. If you are using Oliver theme that shows category blocks on homepage then you have two options to set it up. The second method is the easier and better one but it won't display the post count.
1) Using Label Widget
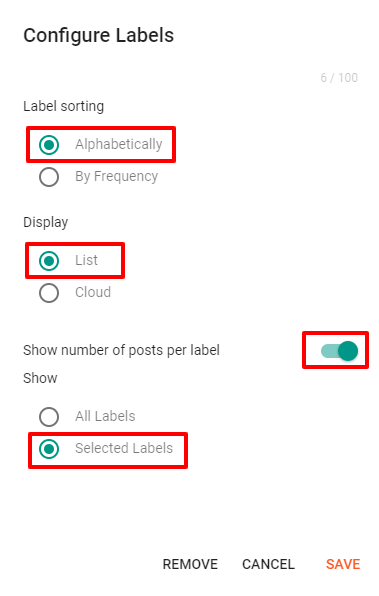
Pros -- Shows number of posts per label
- Labels will be displayed in alphabetical order. You cannot change their order
- Limited to 40 category blocks
- When you add more category blocks through Label widget, you will need to change order of images too.
Open the 'Label' widget under Category heading and choose these settings.
Press the 'Save' button after you have selected the labels you want to display.
Now go to Theme > click the arrow beside 'Customize' > then click on 'EDIT HTML'. Your theme's code will show up. Near the very beginning you will find the code in this format -
<Variable name='category.image.1' description='Category Image 1' type='string' value='https://1.bp.blogspot.com/-EgDj4Xc4hBQ/YTginjPyiyI/AAAAAAAAGQM/C86njxVTFC8JrfuI8k-cupLmFSoIE7F8gCLcBGAsYHQ/s16000/girl.jpg'/>

<Variable name='category.image.2' description='Category Image 2' type='string' value='https://1.bp.blogspot.com/--Pd_j_piiWo/YTgikb82OLI/AAAAAAAAGP0/XTj35YbRwOIaZrn0Gb3WcNlSJ7TBSACdACLcBGAsYHQ/s16000/cliff.jpg'/>

<Variable name='category.image.3' description='Category Image 3' type='string' value='https://1.bp.blogspot.com/-PtqWVn3n5vg/YTgikii_4SI/AAAAAAAAGP4/a_BFN_LRydUS5Zl_EfxrxT4baHH_A0CcgCLcBGAsYHQ/s16000/clouds.jpg'/>

<Variable name='category.image.4' description='Category Image 4' type='string' value='#'/>

<Variable name='category.image.5' description='Category Image 5' type='string' value='#'/>
The idea is simple. We are assigning images to labels in an orderly way. So, first image will get attached to first label. Second image will get attached to second label and so on.
You just have to change the yellow color with your image urls. Onace you have added your images, press the 'Save' icon on the top right corner.
2) Using HTML widget
Adding Category blocks using Label widget has many limitations and can be confusing for few people. A better option to add Category blocks on homepage is through HTML widget. It has only one drawback i.e number of posts won't be displayed.Pros -
- You can add Unlimited Category blocks
- Arrange category blocks as you like, no limitations.
- You can easily insert or remove any category block without the need to change other lines of codes
- Image are tied to category name so new blocks don't affect them
- Just one, the number below label name won't show up
If you are okay with not showing the category count, go to Layout, then click the edit link on Label widget and remove it. After Label is removed, you will see '+ Add a Gadget' link in it's place. Click on it and choose 'HTML/JavaScript' Gadget. Now, in the 'Content' field, paste the below code -
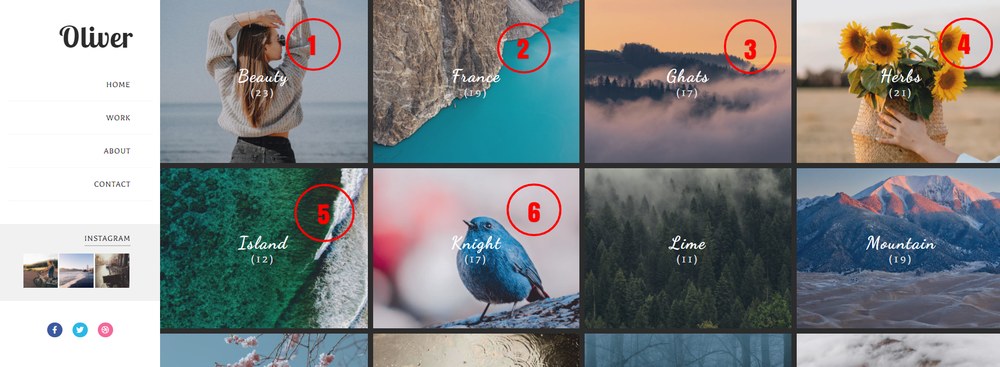
<a href='#'><img src='image.jpg' /><span>Beauty</span></a>
<a href='#'><img src='image.jpg' /><span>France</span></a>
<a href='#'><img src='image.jpg' /><span>Ghats</span></a>
<a href='#'><img src='image.jpg' /><span>Herbs</span></a>
Here, one line represents one category block. Add as many lines as you want.
Replace Green colors with label links ( for example - https://oliverdemo.blogspot.com/search/label/Beauty ). Replace red color with image urls (for example - https://1.bp.blogspot.com/-EgDj4Xc4hBQ/YTginjPyiyI/AAAAAAAAGQM/C86njxVTFC8JrfuI8k-cupLmFSoIE7F8gCLcBGAsYHQ/s16000/girl.jpg ). Replace skyblue color with the text.
Finally press the 'Save' button.
(D) Grid Images
Back To TopHover Effect
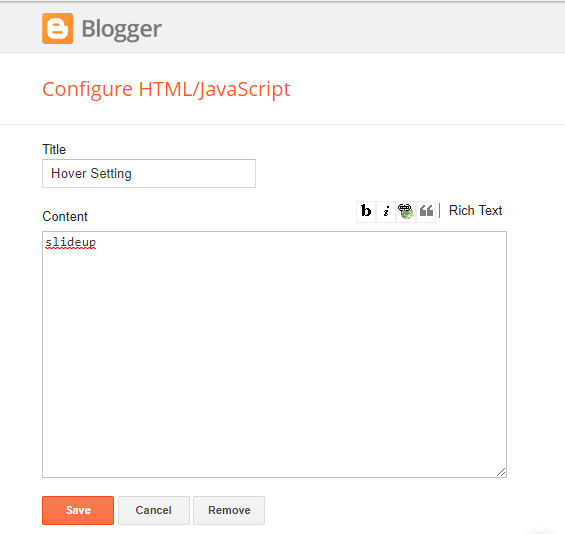
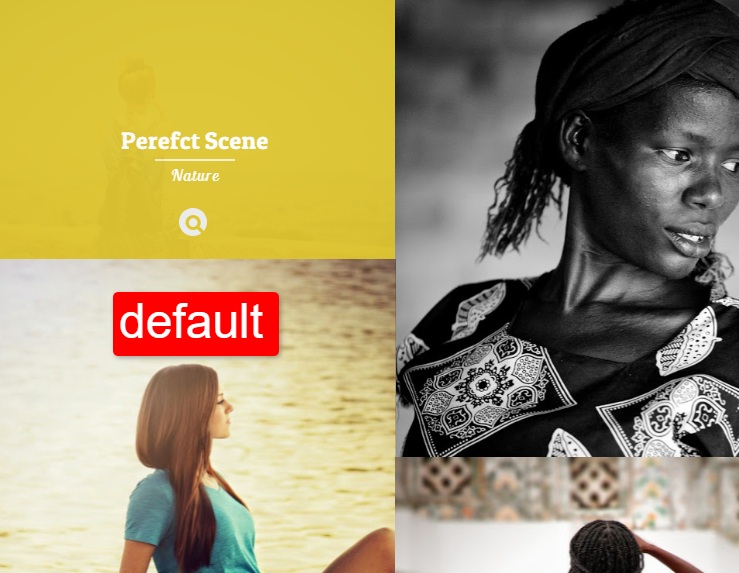
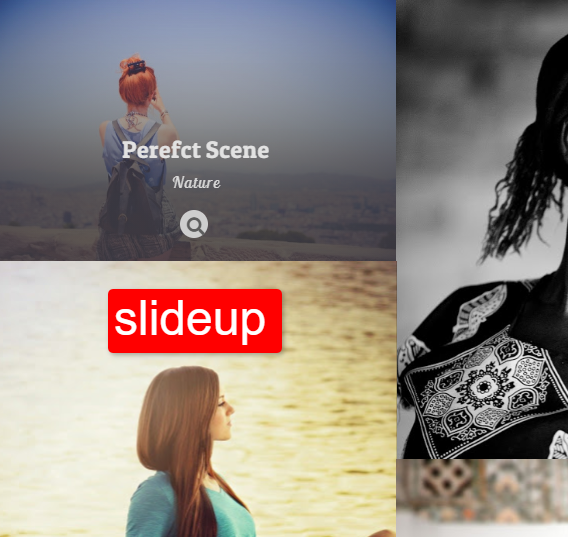
The code inside Grid Hover Setting widget is this -
default
Replace it with slideup to change hover effect on images.
Here's how they look like.
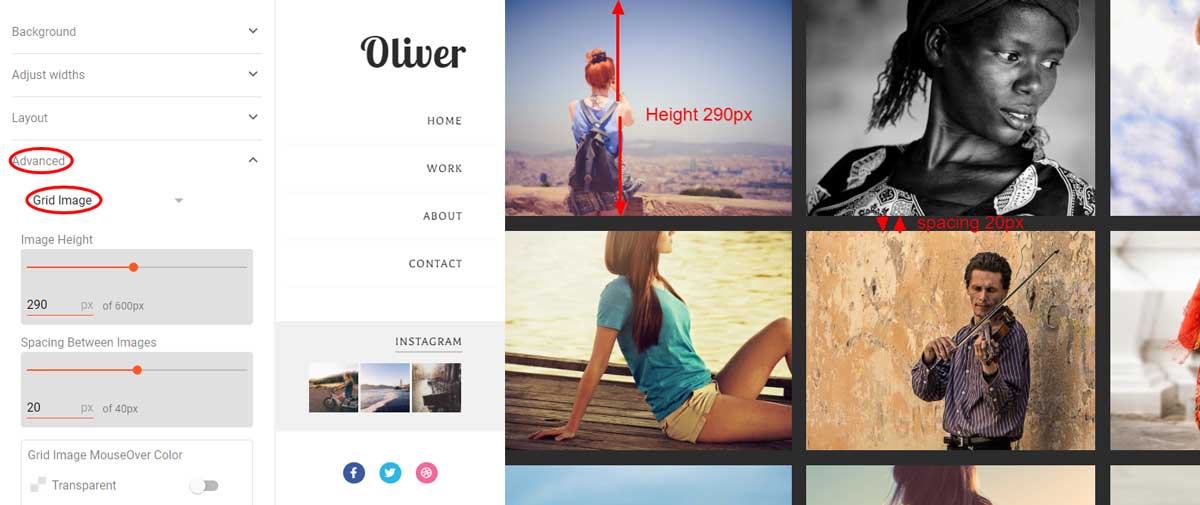
Height and Spacing
Height can be auto or fixed.
You can adjust it height and spacing by going to Theme > Customize > Advanced > Grid Image. Use the slider to increase or decrease height. If you want to reset back to default, click 'Clear advanced changes to Grid Image' at the bottom. After resetting images will go back to auto height and no spacing.
Note - blogger only allows live preview on homepage. For other pages, make the changes you want and save it. Then open your blog in new tab and see if you like it. If you don't, simply make changes again and save. You can click the rest link at the bottom to rest it back to default.
(E) Blog/Articles Pages
Back To Top
All you need to do is add one of the four supported label to your post and it will stop appearing in grid pages and will appears as text post. Four supported labels are - blog
articles
stories
news
If any of the label is among the four mentioned, it will stop showing in grid and will show up as text post in their respective label. Also note that 'Related Post' on posts with above four mentioned labels will have only text.
(F) Other Settings and Notes
Back To Top
Ads
If you need to insert ads below post title or below post body, follow this guide -
1) To insert AD below title.
Go to 'Theme' > Click the arrow beside 'Customize' > Then Click 'Edit HTML' > Click anywhere in the code then Press CTRL+F > In the Search box type below title and hit Enter. You will be taken to this line of code -
<!-- below title ad start -->

 <!-- below title ad end -->
Place your Ad code between these lines. Finally Save the theme.
2) To insert AD below post.
Go to 'Theme' > Click the arrow beside 'Customize' > Then Click 'Edit HTML' > Click anywhere in the code then Press CTRL+F > In the Search box type below article and hit Enter. You will reach this line of code -
<!-- below article ad start -->

 <!-- below article ad end -->
Place your AD code between the lines. Finally Save the theme.
Pagination
One problem people often face with blogger is auto pagination. Your number of posts setting is not respected by blogger. Back in 2010 google was looking to speed up blogger blog so the solution they came up was 'auto pagination'. It works like this - when your pages like homepage, archives, labels and search pages (i.e. pages that display more than one post), contains too much content, blogger system will automatically remove few posts from that page to make the page load faster. Too much content could be a lot of images or ridiculously high amount of text. Note that it's from blogger side and we can't do anything about it.
If you have just a few images per post you should be fine. It will not affect you. But if you have too many high quality images per posts, blogger is likely to remove some posts. They will still be displayed when you click older posts or (in case of infinite scrolling) scroll to the bottom.
Note that it's not how many images are there in one post but how many in total are loading in that posts list page i.e pages like label or archive. Blogger has not revealed how it calculates it's limit.
Solution - The best solution if auto pagination effects you is to use 'jump break'. Jump break is used in blogger to add 'Read More' button to show the full post. We can use it to exclude content on label, archive pages so that our pagination doesn't break. In our case, you don't have to worry about where to place it. After first paragraph, after first image, first line, anywhere you want but make sure it's around the top. No need to worry if our image is after the jump break. On image grid we don't show 'Read More' button so placement is irrelevant.
(G) Theme Designer
Back To TopTo access Blogger Theme Designer, go to 'Theme', then click on 'Customize'. Under 'Advanced', there is dropdown where you can pick what you want to change.
If you don't like the changes you have made, clicking 'clear advanced changes' link at the bottom will reset all changes back to default for that specific section. Let's say you picked 'Social Media Icons' from the dropdown, made some changes, saved it. Now, you want to undo these icon colors, simply go to bottom in 'Social Media Icon' section and click 'clear advanced changes to Social Media Icon' and your icon colors are back to default. No other changes will reset. Only the section where you click that reset link.
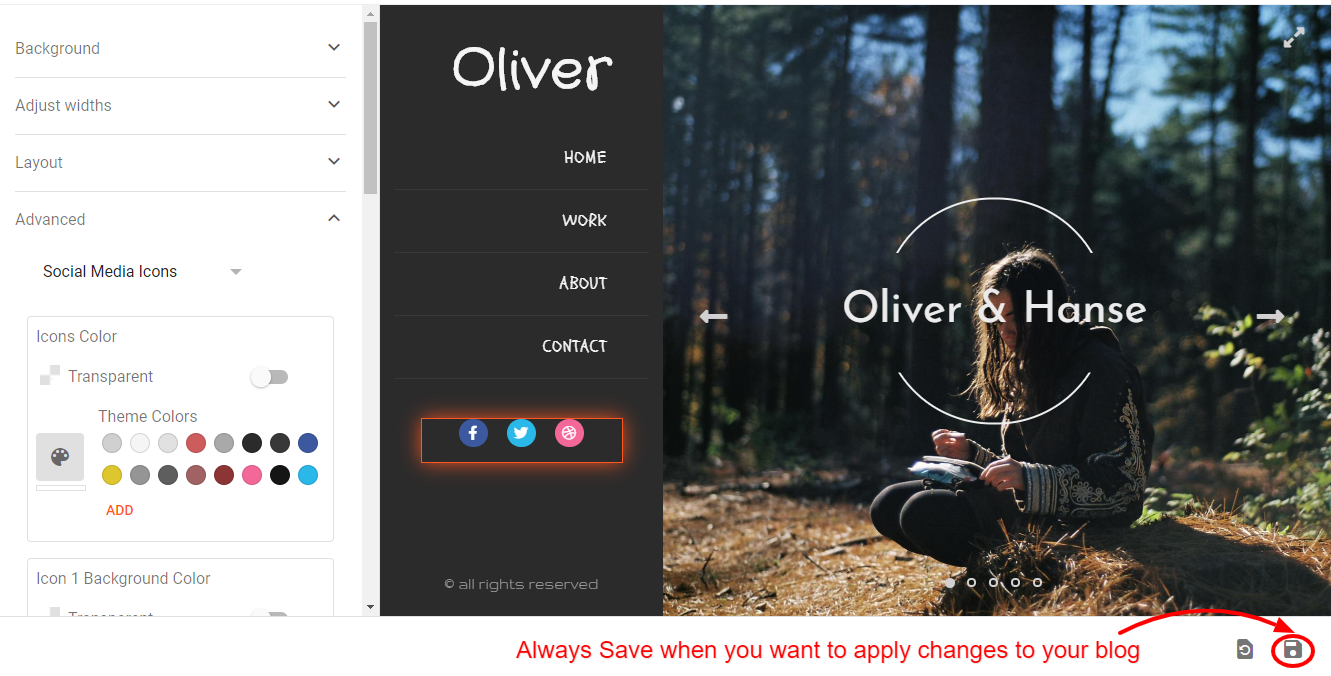
Do Remember to click 'Save' button when you want to apply changes to your blog.
Notes -
1) Don't use too many fonts. Fonts take time to load which will make your blog load slower. Limit them to two or three at most. Once used, you can repeat that font any number of time.
2) Menu are a little different on touch devices because it's hard to hover on touch devices. So, on those devices, submenu appear below instead of right. You can change it's colors using 'Menu Style for Touch Devices' section.
3) Like mentioned before, live editing (colors/fonts) is only available on homepage. Blogger doesn't allow for live preview of other pages. So, make the changes. Save them. Then view on your blog.
(H) Sources and Credits
Back To Top- Masonry by Desandro
- Imagesloaded by Desandro
- Font Awesome (version 5.13.1)
- Modernizr
- PhotoRama
- Direction Aware Hover by Codrops
- Menu Cool
- Bpopup
- jQuery Easing
- Google Fonts -
- Balthazar
- Patua One
- Lobster Two
Once again, thank you so much for purchasing this theme. As I said at the beginning, I'd be glad to help you if you have any questions relating to this theme.