
Thank you for purchasing this theme. If you have any questions that are beyond the scope of this help file, please feel free to contact us.
Unnao is a magazine/news responsive blogger theme which gracefully adapts to mobile devices to make sure your customer finds you on the go. Follow this guide to install Unnao Theme on your blog and make the required changes.
Before we start the installtion process, download the theme from ThemeForest and unzip it.
Installing this blogger theme requires you to follow two simple step.
An alternate way to install the theme is to first remove all the widgets from Layout, then go to Theme > Click the arrow beside Customize > choose Restore > then simply upload unnao.xml file. The problem with this method is that sometimes widgets are put in wrong places after upload. You then have to go to Layout and rearrange them. So, the recommemded method is to follow the two step guide mentioned above.
Once you have uploaded the theme, here's a list of points to remember -
1) If you want to hide a widget for some time, instead of removing it, open the widget and turn off the option named Show this widget
2) Go to Settings > Under Site feed > Make sure Allow blog feed is set to Full
3) Some widgets do not need Title text, so if widget title is showing in some inappropriate place, simply open the widget and remove Post Title. Just leave it blank.
4) Go to Theme > Click the arrow beside Customize > In Mobile Setting, make sure Desktop is selected.
5) If your blog is new, Popular posts widget will take some time to appear so don't worry.
6) Go to https://www.blogger.com/edit-profile.g and make sure 'Show my profile page' is ticked and your name and image is present. Also fill in some text in Introduction box. Author profile below post won't appear if Introduction is empty.
7) For fetching thumbnail for custom widgets, this is the preferance images uploaded on blogger> video thumbnail> 3rd party images> placeholder image
8) It is highly recommended to use images uploaded on blogger for your blog. We compress them using webp format and resize them to appropriate size that helps load your blog faster. 3rd party images can also sometime cause thumbnail issue.
Go to Theme > Customize > Advanced > Blog Header > Srcoll to find the option named Header Box Height > Change it's value.
Finally click the Save icon on the bottom right corner.
Go to Theme > Customize > Advanced > Blog Header > here you will find all the colors to change
See section (Q) Theme Options to show background Image in the header section.
Go to Layout, click on the edit link on Header widget to open it.
Replace Blog Title and Description with your own.
If you want to use an image logo, simply upload the image using Upload image from computer option and then choose the option Instead of title and description for Image Placement.
Finally press the Save button.
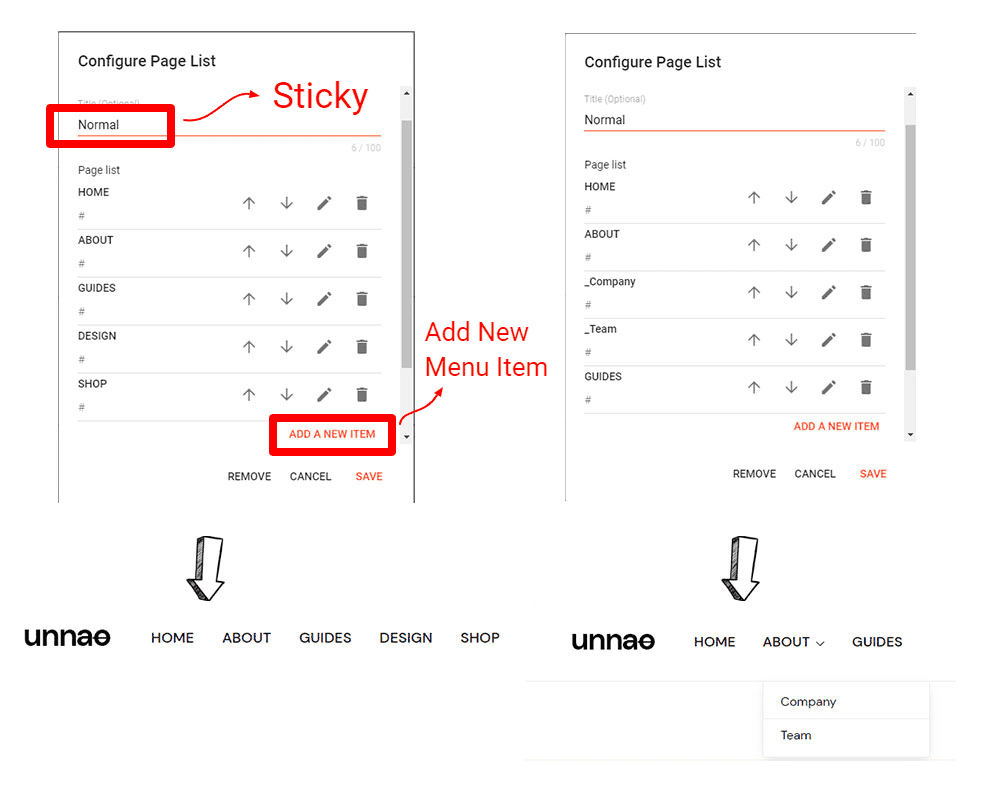
Click on the edit link on Menu widget. A dialog box will open up with list of menu items and options to add/remove/edit them.
Click the pencil icon to edit a menu item. Use arrow to move a menu item up or down.
To add a new item, scroll to the bottom and click ADD A NEW ITEM. A new dialog box will open with Page Name and Page Url option. Type menu name in Page Name and your menu link in Page Url and then click the save button.
Let's understand how menu and submenu works.
Setting up first level menu is pretty easy. Simply click ADD A NEW ITEM and add your menu name and url. Then keep repeating it to adding more items.
Once you have all the items you need, simply click the Save button at the bottom.
To add a submenu, simply add an underscore (_) before the menu name. Then use arrows to put it below it's parent.
Adding mega menu item is same as Submenu but instead of underscore(_), we use hash (#).

To add sub sub menu inside your submenu item, use double underscore (__). Then use arrows to put it below it's parent.
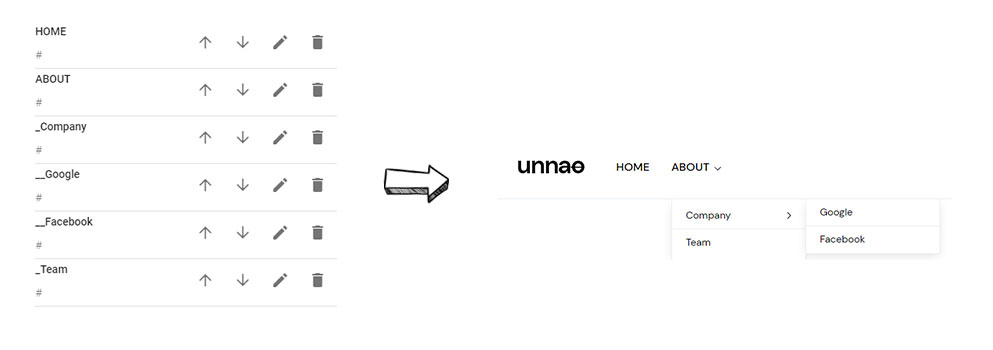 Note that here the parent has to be a submnu item which is represented by an underscore in the beggining.
If you want your menu to stick to the top as you scroll down, change Menu widget Title to Sticky
To revert it back to normal, simply change Menu widget Title to Normal
Open Header Button widget and you will see this code inside widget's content box.
Open Header Alert widget and switch on the Show this widget option.
Replace widget Title with your text and add a link using 'Add a New Item' if you need it.
If you want to customize it further, you need to replace the current widget with HTML/JavaScript widget. Here's how to do it -
First remove current widget, then click 'Add a Gadget' link and choose 'HTML/JavaScript', then keep the widget Title empty and paste your html code inside Content area.
You can generate HTML code using post editor. Simply create new post, add text, link, etc.. then switch to HTML View by clicking the pencil icon in the toolbar. Finally copy the code inside HTML view. Paste this in your widget content box.
Go to Layout> Click the 'Edit' link to open the widget> turn on 'Show this widget' option> Click the Save button.
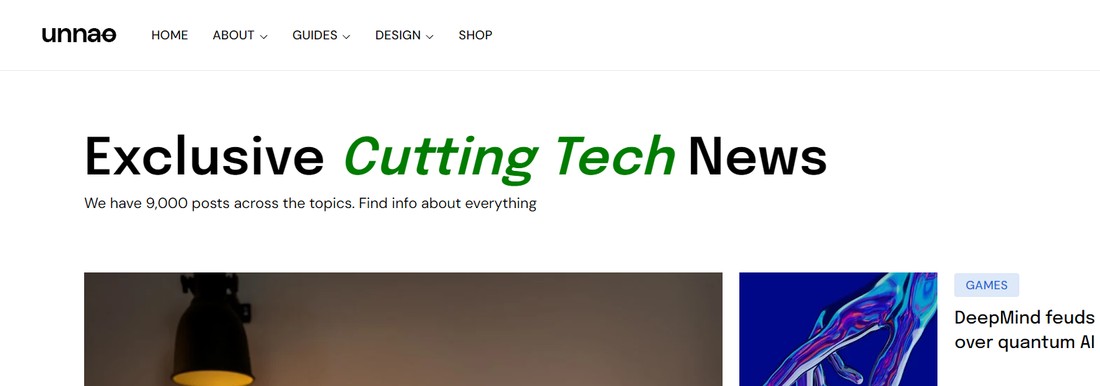
To add italic style to the title, simply wrap the text with italic tag. Like this - Cutting Tech
So, Exclusive Cutting Tech News becomes Exclusive Cutting Tech Tech News
You can change italic text color using Theme Designer. Go to Theme> Customize> Advanced> Blog Info
Open the Featured Posts widget, inside the content area you will find the below code -
Let's understand why we need featured_remove_label option.
Say you didn't change any thing in the above script, then latest 5 posts with label featured will show up. But mosts posts will show featured as a label above post title because blogger lists labels alphabetically.
So, what this option does is tells the script, if the first label is named featured, then show the second label name. This way you don't end up with having mosts posts with same label name in featured section.
In a nutshell, it can be any label name that you don't want to shown in featured section.
Open the Discover widget inside Homepage_Sections. You will find code in this format -
Go to Layout and inside Homepage_Section add the Label widget. Make sure Display option is set to Cloud

Click Add a Gadget inside Homepage_Sections, then choose HTML/JavaScript, inside Title type your section title and inside Content paste the below code -
lists of label names seperated by a comma. For the first tab that is named all, 4 latest posts that have any of the above mentioned label will be displayed. On click the label tab, only posts with that exact label name will be displayed.
If you show only one label name
If you want to show date below post title, change false to true
Choose the color scheme for each individual post section. It has three options - blue, red, green and black
If you choose black theme, you can customize it to any color you want using Theme> Customize> Advanced> Homepage Section Type1
Show/hide previous and next arrows. By default it is true, if you want to hide the arrows, change it to false
Add text below widget title
Click Add a Gadget inside Homepage_Sections, then choose HTML/JavaScript, in content box paste the below code -
Here data-tags do not create tabs. But they work the same as type1 in fetching posts. If you add multiple labels seperated by a comma, latest posts with any of the above mentioned labels will be displayed. You are not limited to just one label. You can pull posts from multiple labels.
There is only one theme for now named black but you can change all it's color to anything you want using Theme > Customize > Advanced > Homepage Section Type2
and works the same as posts section type1
This section does not have subtitle option.

This is default featured posts widget by blogger. You can add it anywhere inside Homepage_Sections
Simply click + Add a Gadget and choose Featured Post
Just make sure all three options Show post title and Show text snippet and show image are ticked. Then simply pick which post you like to display from list of all the posts.
This is also the default popular post widget provided by blogger. Add it anywhere inside Homepage_Sections and choose options to your liking. Make sure Maximum number of shown posts is selected to 2
It is automatically populated by the latest posts. To change number of posts displayed here, go to Setting, under Posts, choose a number for Max posts shown on main page Open the Footer_Subscribe widget. Inside Title, you will see this code -
Inside Content, you will find this code -
Left footer by default has two widgets. First one is an Image widget, which you can use to add your blog logo or anything you like. Second one is Text widget you can use for adding description. You can add more widget and see for yourself if it looks good.
This is the area where we have added link lists. By default, we have added four Link List widgets. Open them and add/remove/modify as you like.
Inside Footer_Info, we have two widget.
First floats to the left which contains copyright text.
Second floats to the right which contains code for social media icons.
Open Social Icon widget, inside content, you will find code in this format -
Replace # with link to your social media profile, icon name with social media name like facebook, twitter, etc and SVG CODE with icon code from here - https://icons.getbootstrap.com/
To get icon code, simply click on any icon then copy the svg code from Copy HTML section
For example -
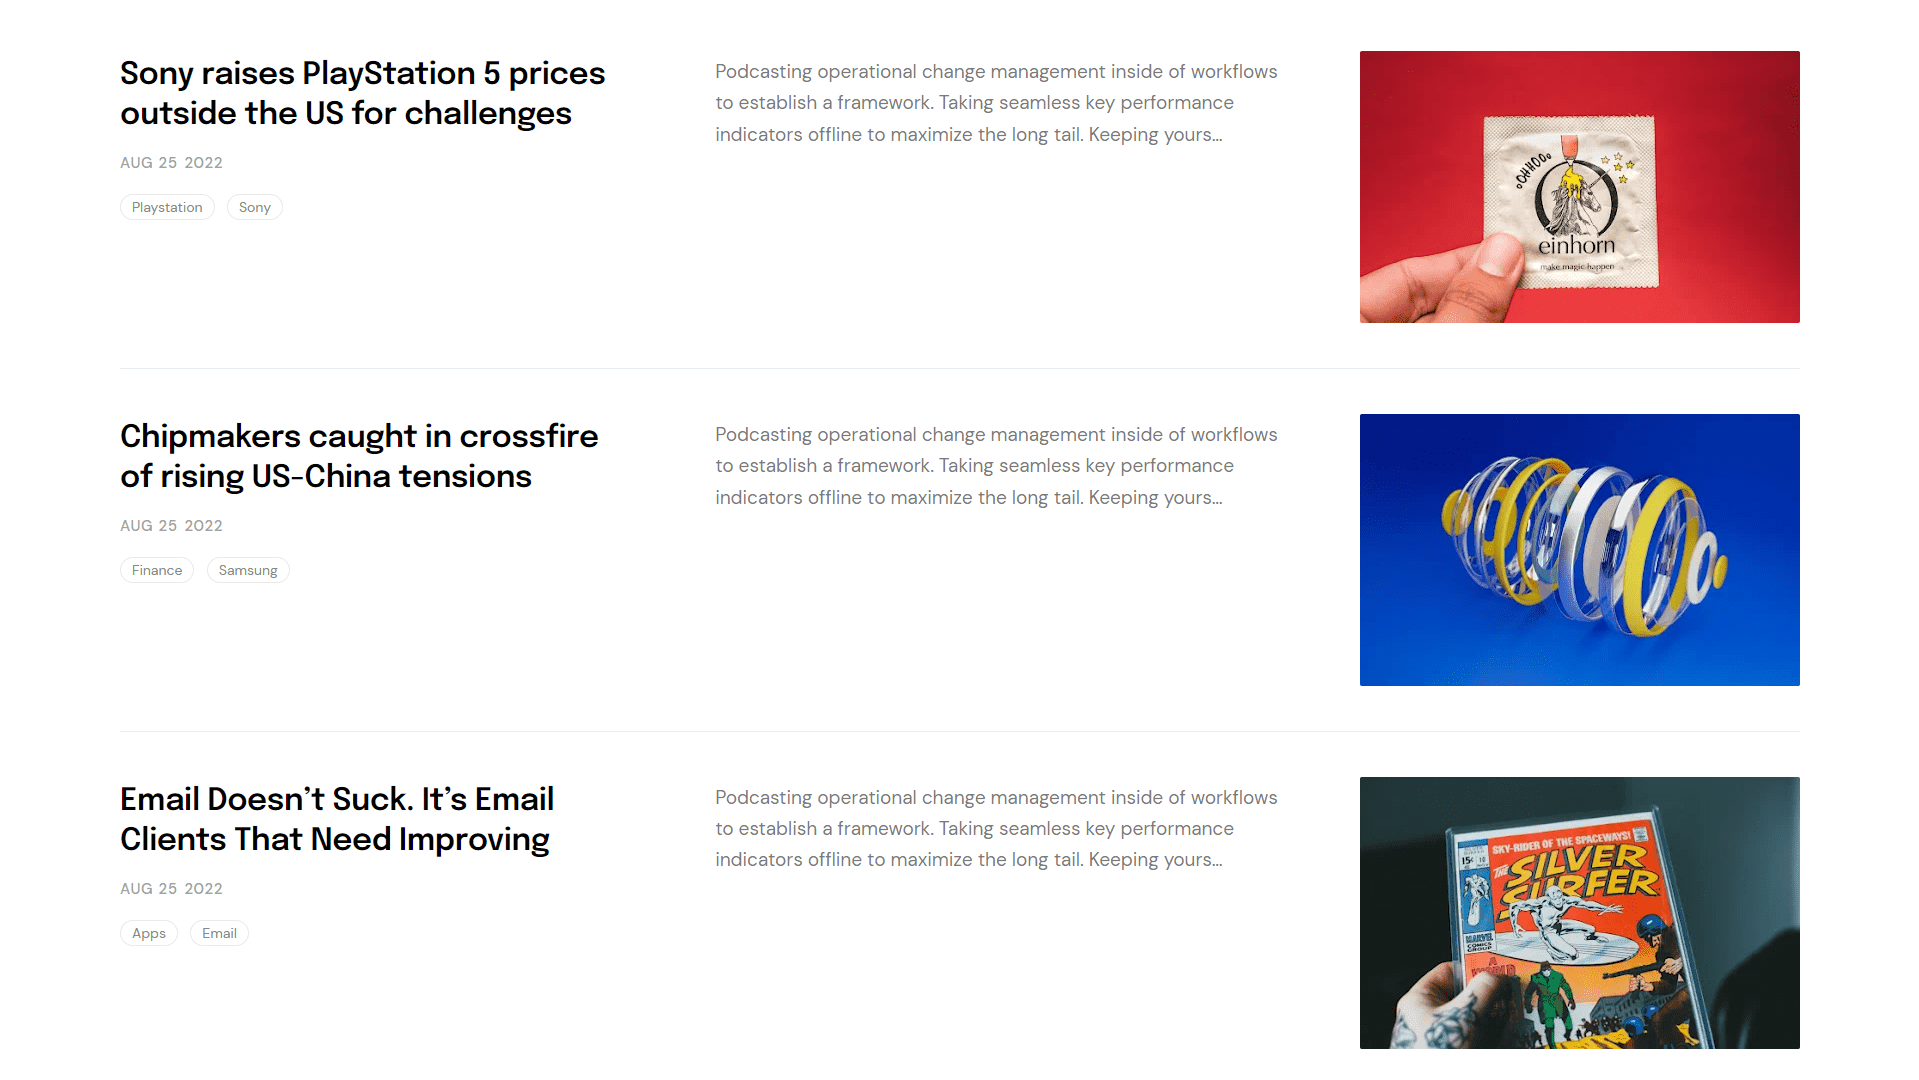
Below the search input box, we have two widget. First is the Label widget that you can find under Search_Tags section in Layout, which displays selected labels.
Second widget is Popular Posts widget which you find find inside Search_Posts section. Go to Layout> Open Blog Posts widget> Make sure items are arranged like the below screenshot
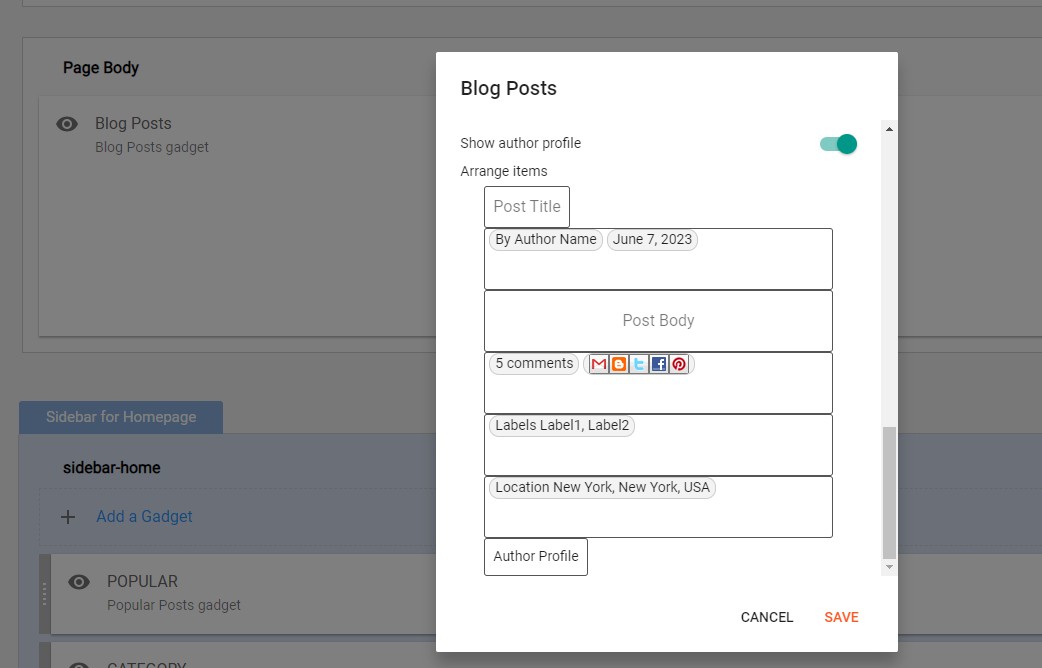
Table of Content automatically appears on top of the post. It will select h2, h3 tags as heading and subheading. If h2 tag is not present in the post, then it will use h3 and h4 as heading and sub heading. So, you don't have to worry about using specific heading tag.
If you want to hide the Table of Contents section, see (Q) Theme Options
Instead of top, if you want to show Table of Content somewhere else inside the post, you just have to insert this code
To add any code inside post, first type your first name or any unique name in your post where you want to add your code, then click the first option i.e pencil icon in the toolbar and choose HTML view, then click anywhere inside HTML code and press press CTRL+F, in the search box type your name and hit Enter. Once you find it, replace it with your code.
This way your code will be added exactly where you want it and you don't have to worry about messing the HTML code.
You have an option to add a post block inside your post. To do so, you have to add this code inside your post.
Add it where to want post block to appear. See Add code inside post for help in adding code to your post.
Add below code in your post. See Add code inside post for help in adding code to your post.
Go to HTML View in your post editor and paste the below code right at the beginning.
This will show up on widgets like this -

and on post page like this -
data-max is the max value of your review. Do you want your review score out of 10 or out of 100? Use whatever value you like.
data-score is the actual review value. So, if data-max is 10 and data-score is 8.6, then review is 8.6 out of 10
Say your data-max is 100 and data-score is 72, then you can turn data-percent to true so your review is 72%. It basically just add a percentage sign after the review score value. Nothing else.
data-title and data-description can be left empty if you don't want a review box but a simple review circle on post page.
To change review box colors on post page, go to Theme> Customize> Advanced> Post Page Reviews
Note that you can add review tag anywhere and any number of time in your post's 'HTML View', use add code technique to insert the code correctly.
See section Theme Options to show/hide Progress bar. On post pages, we have the sidebar section.
You have the option to add/remove sidebar on Homepage. See Theme Options for more info.
You can add/remove any widget inside section named Sidebar in Layout. It's up to you what you want to add there. We do have a widget that we custom made for you which show posts by labels.
Click Add a Gadet inside Sidebar section. Choose HTML/JavaScript, in the Content box, paste the below code -
Use true if you want to show image and use false if you want to hide the image.
Show hide date below post title
Number of posts to display
Lists of label names seperated by a comma. Latest posts with any of the above mentioned labels will be displayed.
Add subtitle below widget title. Leave it blank if you don't want to display a subtitle
Next up we have Related Posts widget. Go to Layout and Open the Related Posts widget. Inside Content, you will find this code -
We have two options here, type1 and type2. Displays different layouts, so choose whichever one you like.
Number of related posts to be displayed
Change true to false, if you want to hide the date below post title
Number of characters to show below post title as post snippet. For example
Maximum number of labels to show above post title for each individual post
Go to Settings, under Errors and redirects, you will find Custom 404 option. Paste the below code inside it.
Go to Theme > Click the arrow beside Customize > Choose Edit HTML
You will find this code near the top. You only need to change value in red
Most options are self explainatory by reading the description value. But let's go through all of them so that there is no confusion.
options - type1, type2, type3


options - true, false
Use true if you want to show background image in header section. Use false if you want to show white background or any other background color. You can change the background color using Theme > Customize > Advanced > Blog Header
option - image link
precondition - set header.background options to true

If you header.background option is set to true, then the image link in this option will be shown as background image. You can change it to whatever you like. Recommended size is around 2000px width and around 100px height.
options - true, false
If true, then labels in (Featured Section) at the top and tabs in (Homepage Section Type1) will have a border around it.
options - any number
If you have added a Label widget inside Layout> Homepage_Section, then you can change the slider speed from here. Simply replace the number with whatever number you want.
options - type1, type2, type3, type4
There are 4 layout types for post pages. Choose the one you like. It will apply to all posts.
options - type1, type2, type3, type4, type5, type6
precondition - set post.layout.type options to type2
If post layout option is set to type2, then you have six background gradient options. Option 1-5 are fixed but if you choose type6, then you can change post title and background color using Theme > Customize > Advanced > Post Page Type2 and Type3
options - true, false
We select the first image in the post and show it as featured image at the top. But if you want to show the image where it was uploaded instead of at the top, you can set this option to false.
true means post page will show first image as featured image.
options - true, false
This is simply showing and hiding Table of Contents on post pages. If you don't want to display Table of Content on any page, set this option to false.
options - left, right
With this option you can change sidebar position to left or right on post pages. Note that this option does not change sidebar position on homepage.
options - true or false
Set this option to true if you want your sidebar on post pages to stick when you scroll.
options - true or false
precondition - set post.layout.type options to type2 or type3
If you want side info (post author, labels and share icons) on post pages to stick when you scroll.
options - true or false
If you want meta description to show on post page below post title, then set this option to true else set it to false.
options - true or false
Set the option to true if you want to show the progress line at the top on post pages. To hide it, simply set it to false
options - true or false
Set it to true if you want to hide comment section and show only when the button is click.
false value will display the whole comment section without any button to show/hide it.
options - true or false
Set this option to true if you want to show sidebar on your homepage. Note that the sidebar on homepage is seperate from sidebar on post page. So, you can have different widgets on homepage and post page.
false will hide the sidebar on homepage.
options - true or false
precondition - set homepage.sidebar options to true
If homepage.sidebar is set to true, you can make your homepage sidebar sticky.
options - type1, type2, type3
Feed of your posts on homePage, labelPages and archivePages can be displayed in three different styles i.e type1 type2 and type3
options - type1, type2
options - any text
Add Heading for Latest Posts on homepage
options - true or false
Turn on/off underline animation below post title
options - true or false
If you want a dark background menu on mobile devices, set this option to true
For light version, set it to false
option - image link
Change the image link in this option to change default image thumbnail when there is no post thumbnail to display
Go to Theme > Click the arrow beside Customize > Choose Edit HTML
You will find this code near the top -
Like this -
You can add your advertisement on many places in this theme.
- Most common one is sidebar. Go to Layout and simply click 'Add a Gadget' link in sidebar section and choose 'HTML/JavaScript'. Paste the ad code in content area and click the save button. Recommended size (width) for sidebar is 300px
- Then you can add your ads anywhere between widgets in Homepage. Simply add a new HTML/JavaScript widget inside 'Homepage_Sections' area and insert your code and insert your code in content area of widget.
- You can also insert ads above and below Related Post in your post page. In Layout, add a new HTML/JavaScript widget inside 'related_Posts' section and insert your code in content area of widget.
- If you want to insert your ad at the top [above Table of Contents] or bottom [Below Post Body] of your post on post page. Do this - Go to Theme> click the arrow beside 'Customize'> choose 'Edit HTML'> click anywhere inside the code and press CTRL+F> In the Search box type Body Top Ad Start and Hit Enter. You will find this code -
For adding code at the bottom of the post, search for Body Footer Ad Start and follow the same process.
Finally, click the save icon on the top right corner.
1) If your ad is not centered and you want to show it at the center of the page. You have to wrap your ad code with center tag. Just add at the begging and at the end. Like this -
2) Another tip is to add spacing at the top or bottom of your ads. For that you simply have to use the line break tag. Say you want to create some spacing at the top of your ad, then just above your ad code insert
tag. You can add multiple tags to create more space. Like this -
You can change text color, background colors and even icon colors using Theme Designer. Go to Theme > Customize > Inside Advanced, you will have all the options. Remeber to click the Save icon on the bottom right corner once you have made all the changes.

I have used the following resources in my theme -
Once again, thank you so much for purchasing this theme. As I said at the beginning, I'd be glad to help you if you have any questions relating to this theme.
If you have a more general question relating to the themes on ThemeForest, you might consider visiting the forums and asking your question there.
Unnao is a magazine/news responsive blogger theme which gracefully adapts to mobile devices to make sure your customer finds you on the go. Follow this guide to install Unnao Theme on your blog and make the required changes.
Table Of Contents
(A) Uploading Theme
(B) Header
(C) Featured Posts
(D) Discover / Label Slider
(E) Posts Section Type1
(F) Posts Section Type2
(G) Single Featured Post
(H) Popular Posts
(I) Posts Feed Section
(J) Subscribe to Email
(K) Footer
(L) Search Box
(M) Single Post Page
(N) Sidebar
(O) Related Post
(P) 404 Page
(Q) Theme Options
(R) Translate
(S) Advertisement
(T) Theme Designer
(U) Sources and Credits
(A) Upload
Back To TopInstalling this blogger theme requires you to follow two simple step.
In this step we simply copy the theme code. Open the Theme file named unnao.xml in any code editor of your choice (notepad, vs code, etc) and copy all the code.
To copy all the code, follow this - click anywhere inside the code, then press (CTRL+A) to select all and then (CRTL+C) to copy.
In Step 2, go to Theme > Click the arrow beside Customize > Choose Edit HTML
Now we will remove all the code and paste the Unnao theme code.
To do so, follow this - click anywhere inside the Theme code, then press (CTRL+A) to select all and then (Del) to delete all the code. Once you have the blank page. Then press (CTRL+V) to paste the code we copied in first step.
Finally press the Save icon on the top right corner.
An alternate way to install the theme is to first remove all the widgets from Layout, then go to Theme > Click the arrow beside Customize > choose Restore > then simply upload unnao.xml file. The problem with this method is that sometimes widgets are put in wrong places after upload. You then have to go to Layout and rearrange them. So, the recommemded method is to follow the two step guide mentioned above.
Once you have uploaded the theme, here's a list of points to remember -
1) If you want to hide a widget for some time, instead of removing it, open the widget and turn off the option named Show this widget
2) Go to Settings > Under Site feed > Make sure Allow blog feed is set to Full
3) Some widgets do not need Title text, so if widget title is showing in some inappropriate place, simply open the widget and remove Post Title. Just leave it blank.
4) Go to Theme > Click the arrow beside Customize > In Mobile Setting, make sure Desktop is selected.
5) If your blog is new, Popular posts widget will take some time to appear so don't worry.
6) Go to https://www.blogger.com/edit-profile.g and make sure 'Show my profile page' is ticked and your name and image is present. Also fill in some text in Introduction box. Author profile below post won't appear if Introduction is empty.
7) For fetching thumbnail for custom widgets, this is the preferance images uploaded on blogger> video thumbnail> 3rd party images> placeholder image
8) It is highly recommended to use images uploaded on blogger for your blog. We compress them using webp format and resize them to appropriate size that helps load your blog faster. 3rd party images can also sometime cause thumbnail issue.
(B) Header
Back To TopGo to Theme > Customize > Advanced > Blog Header > Srcoll to find the option named Header Box Height > Change it's value.
Finally click the Save icon on the bottom right corner.
Go to Theme > Customize > Advanced > Blog Header > here you will find all the colors to change
See section (Q) Theme Options to show background Image in the header section.
(B1) Blog Title / Logo
Go to Layout, click on the edit link on Header widget to open it.
Replace Blog Title and Description with your own.
If you want to use an image logo, simply upload the image using Upload image from computer option and then choose the option Instead of title and description for Image Placement.
Finally press the Save button.
(B2) Menu
Click on the edit link on Menu widget. A dialog box will open up with list of menu items and options to add/remove/edit them.
Click the pencil icon to edit a menu item. Use arrow to move a menu item up or down.
To add a new item, scroll to the bottom and click ADD A NEW ITEM. A new dialog box will open with Page Name and Page Url option. Type menu name in Page Name and your menu link in Page Url and then click the save button.
Let's understand how menu and submenu works.

Setting up first level menu is pretty easy. Simply click ADD A NEW ITEM and add your menu name and url. Then keep repeating it to adding more items.
Once you have all the items you need, simply click the Save button at the bottom.
To add a submenu, simply add an underscore (_) before the menu name. Then use arrows to put it below it's parent.
Adding mega menu item is same as Submenu but instead of underscore(_), we use hash (#).

To add sub sub menu inside your submenu item, use double underscore (__). Then use arrows to put it below it's parent.

If you want your menu to stick to the top as you scroll down, change Menu widget Title to Sticky
To revert it back to normal, simply change Menu widget Title to Normal
(B3) Header Button
Open Header Button widget and you will see this code inside widget's content box.
<a href='#'>Let's Talk</a>
(B4) Header Alert Bar
Open Header Alert widget and switch on the Show this widget option.
Replace widget Title with your text and add a link using 'Add a New Item' if you need it.
If you want to customize it further, you need to replace the current widget with HTML/JavaScript widget. Here's how to do it -
First remove current widget, then click 'Add a Gadget' link and choose 'HTML/JavaScript', then keep the widget Title empty and paste your html code inside Content area.
You can generate HTML code using post editor. Simply create new post, add text, link, etc.. then switch to HTML View by clicking the pencil icon in the toolbar. Finally copy the code inside HTML view. Paste this in your widget content box.
(B5) Blog Info
Go to Layout> Click the 'Edit' link to open the widget> turn on 'Show this widget' option> Click the Save button.
To add italic style to the title, simply wrap the text with italic tag. Like this - Cutting Tech
So, Exclusive Cutting Tech News becomes Exclusive Cutting Tech Tech News
You can change italic text color using Theme Designer. Go to Theme> Customize> Advanced> Blog Info
(C) Featured Posts
Back To Top
Open the Featured Posts widget, inside the content area you will find the below code -
<script>
var featured_posts_date= false;
var featured_remove_label='featured';
</script>
<script type='text/javascript' src='/feeds/posts/default/-/featured?published&max-results=5&alt=json-in-script&callback=featured'></script>
Let's understand why we need featured_remove_label option.
Say you didn't change any thing in the above script, then latest 5 posts with label featured will show up. But mosts posts will show featured as a label above post title because blogger lists labels alphabetically.
So, what this option does is tells the script, if the first label is named featured, then show the second label name. This way you don't end up with having mosts posts with same label name in featured section.
In a nutshell, it can be any label name that you don't want to shown in featured section.
(D) Dicover / Label Slider
Back To TopDiscover
Open the Discover widget inside Homepage_Sections. You will find code in this format -
<tags-blocks>
<a href='#'><img alt='##' src='###'/><span>ADOBE<p>8</p></span></a>
<a href='#'><img alt='##' src='###'/><span>TESLA<p>6</p></span></a>

<a href='#'><img alt='##' src='###'/><span>DISRUPT<p>12</p></span></a>

<a href='#'><img alt='##' src='###'/><span>SPOTIFY<p>4</p></span></a>

<a href='#'><img alt='##' src='###'/><span>NETFLIX<p>3</p></span></a>

</tags-blocks>
<a href='https://myblog.blogspot.com/p/hello.html'><img alt='Cute Kid' src='https://blogger.googleusercontent.com/img/b/R29vZ2xl/s1600/girl-glass.jpg'/><span>TECH<p>3</p></span></a>
Label Slider
Go to Layout and inside Homepage_Section add the Label widget. Make sure Display option is set to Cloud
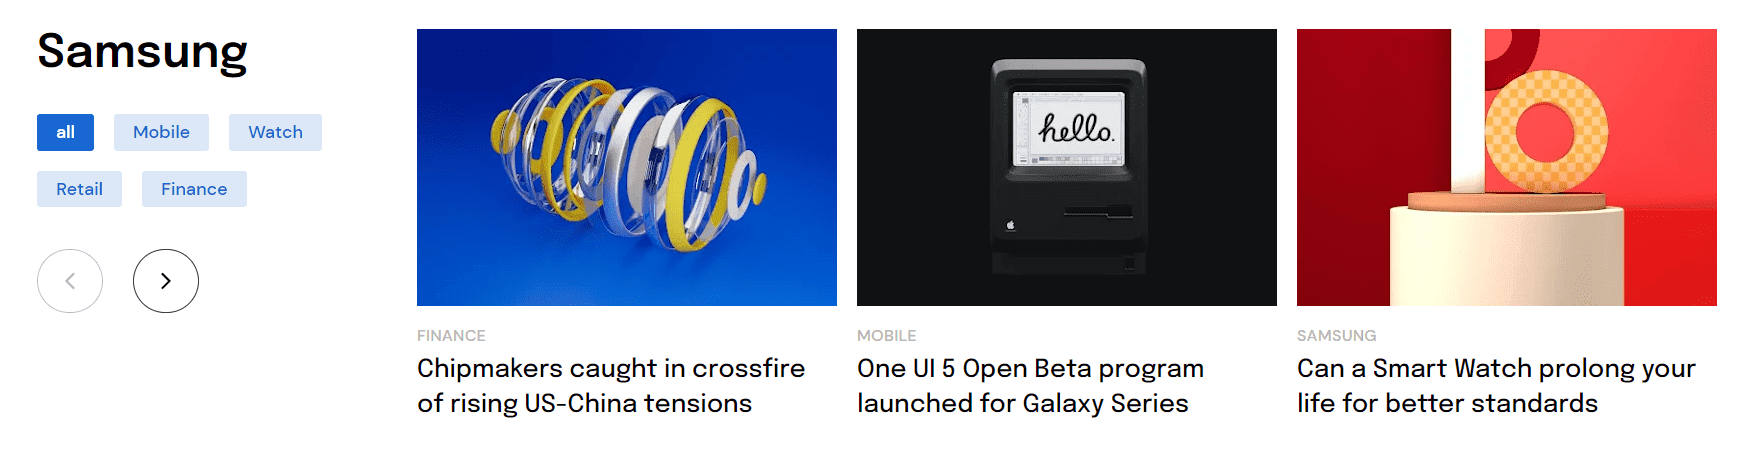
(E) Posts Section Type1
Back To Top
Click Add a Gadget inside Homepage_Sections, then choose HTML/JavaScript, inside Title type your section title and inside Content paste the below code -
<div class='type1' data-tags='Mobile,Watch,Retail,Finance' data-date='false' data-theme='blue' data-arrow='true' data-subtitle=''></div>
lists of label names seperated by a comma. For the first tab that is named all, 4 latest posts that have any of the above mentioned label will be displayed. On click the label tab, only posts with that exact label name will be displayed.
If you show only one label name
data-tags='Retail' then tabs will not be displayed. Note that labels are case sensitive which means tech and Tech are two different labels. So add the correct one.If you want to show date below post title, change false to true
Choose the color scheme for each individual post section. It has three options - blue, red, green and black
If you choose black theme, you can customize it to any color you want using Theme> Customize> Advanced> Homepage Section Type1
Show/hide previous and next arrows. By default it is true, if you want to hide the arrows, change it to false
Add text below widget title
data-subtitle='hello world' or leave it empty to not show any subtitle.(F) Posts Section Type2
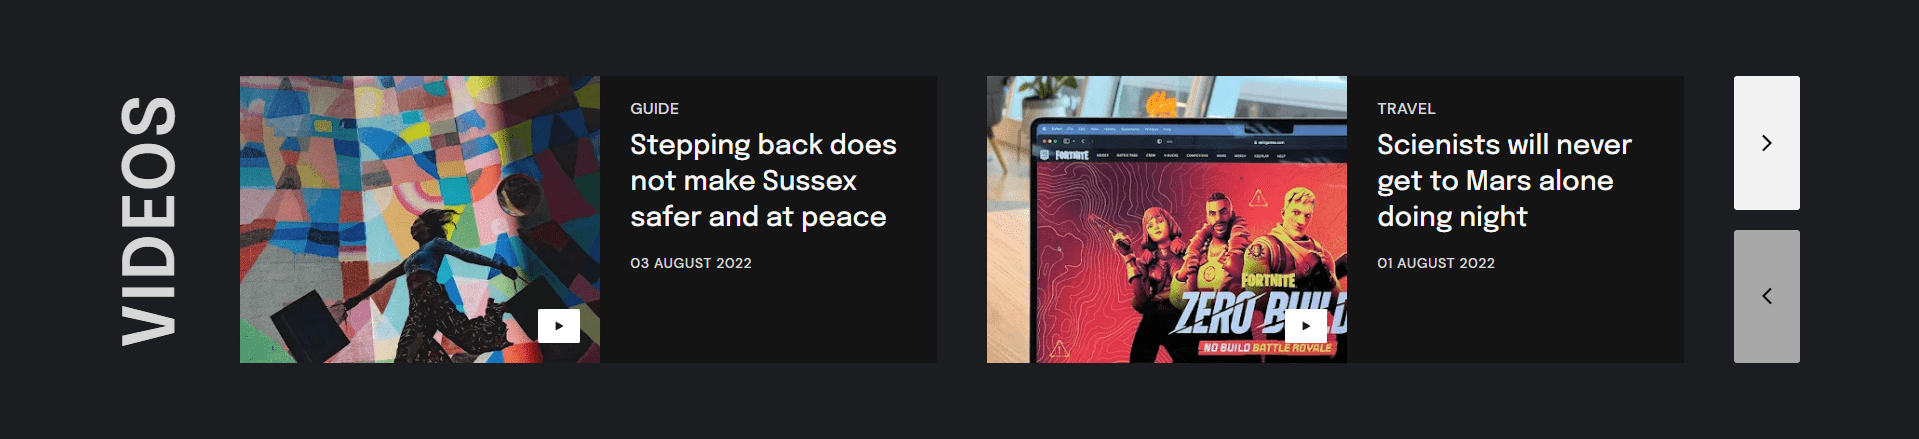
Back To Top
Click Add a Gadget inside Homepage_Sections, then choose HTML/JavaScript, in content box paste the below code -
<div class='type2' data-tags='Videos, Watches' data-date='true' data-theme='black' data-arrow='true'></div>
Here data-tags do not create tabs. But they work the same as type1 in fetching posts. If you add multiple labels seperated by a comma, latest posts with any of the above mentioned labels will be displayed. You are not limited to just one label. You can pull posts from multiple labels.
There is only one theme for now named black but you can change all it's color to anything you want using Theme > Customize > Advanced > Homepage Section Type2
and works the same as posts section type1
This section does not have subtitle option.
(G) Single Featured Post
Back To Top
This is default featured posts widget by blogger. You can add it anywhere inside Homepage_Sections
Simply click + Add a Gadget and choose Featured Post
Just make sure all three options Show post title and Show text snippet and show image are ticked. Then simply pick which post you like to display from list of all the posts.
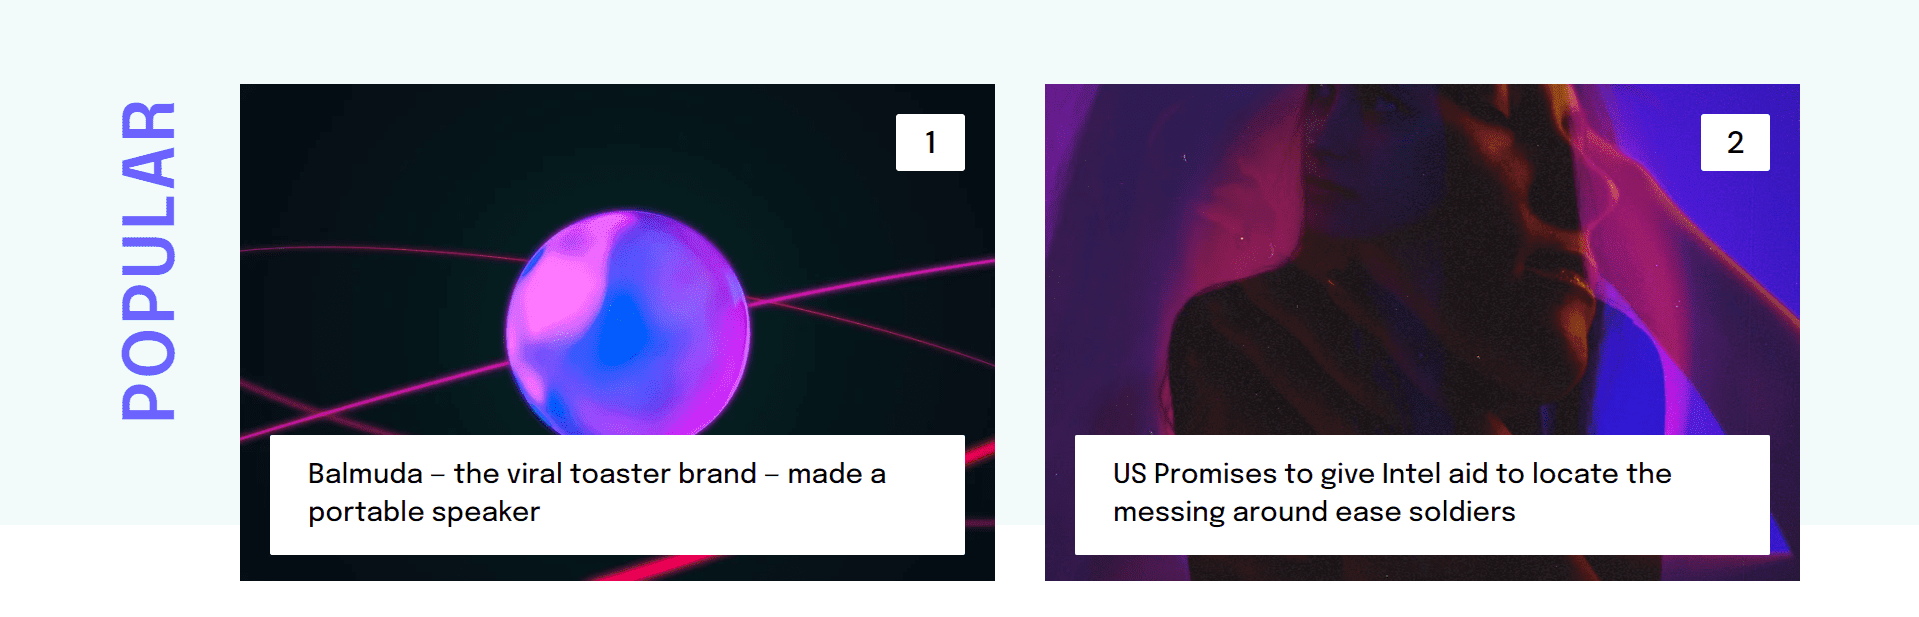
(H) Popular Posts
Back To Top
This is also the default popular post widget provided by blogger. Add it anywhere inside Homepage_Sections and choose options to your liking. Make sure Maximum number of shown posts is selected to 2
(I) Latest Posts Section
Back To Top
It is automatically populated by the latest posts. To change number of posts displayed here, go to Setting, under Posts, choose a number for Max posts shown on main page
(J) Subscribe to Email
Back To Top
<b>Subscribe to Our Newsletter</b> and recieve amazing content
Inside Content, you will find this code -
<form action='https://api.follow.it/subscription-form/N0JsYVNwVGYxKzBkQWJDWWMyUzQyM0tsQnpSMXo0djRGM3pIZlJxWmFwelFvSWhwSmMxUHRUSWlENT=/8' method='post' target='_blank'>
              <input type='email' value='' name='EMAIL' class='email' placeholder='Enter your email' required/>
              <input class='submit' type='submit' value='Subscribe' />
</form>
(K1) Left Footer
Left footer by default has two widgets. First one is an Image widget, which you can use to add your blog logo or anything you like. Second one is Text widget you can use for adding description. You can add more widget and see for yourself if it looks good.
(K2) Right Footer
This is the area where we have added link lists. By default, we have added four Link List widgets. Open them and add/remove/modify as you like.
(K3) Credit Line
Inside Footer_Info, we have two widget.
First floats to the left which contains copyright text.
Second floats to the right which contains code for social media icons.
Open Social Icon widget, inside content, you will find code in this format -
<a href='#' aria-label='icon name'>SVG CODE</a><div><a href='#' aria-label='icon name'>SVG CODE</a></div><div><a href='#' aria-label='icon name'>SVG CODE</a></div><div><a href='#' aria-label='icon name'>SVG CODE</a></div>
Replace # with link to your social media profile, icon name with social media name like facebook, twitter, etc and SVG CODE with icon code from here - https://icons.getbootstrap.com/
To get icon code, simply click on any icon then copy the svg code from Copy HTML section
For example -
<a href='https://twitter.com/jack' aria-label='twitter'><div><span style='color: #93c47d;'>
<path d='M5.026 15c6.038 0 9.341-5.003 9.341-9.334 0-.14 0-.282-.006-.422A6.685 6.685 0 0 0 16 3.542a6.658 6.658 0 0 1-1.889.518 3.301 3.301 0 0 0 1.447-1.817 6.533 6.533 0 0 1-2.087.793A3.286 3.286 0 0 0 7.875 6.03a9.325 9.325 0 0 1-6.767-3.429 3.289 3.289 0 0 0 1.018 4.382A3.323 3.323 0 0 1 .64 6.575v.045a3.288 3.288 0 0 0 2.632 3.218 3.203 3.203 0 0 1-.865.115 3.23 3.23 0 0 1-.614-.057 3.283 3.283 0 0 0 3.067 2.277A6.588 6.588 0 0 1 .78 13.58a6.32 6.32 0 0 1-.78-.045A9.344 9.344 0 0 0 5.026 15z'></path>
</span></a></div>
(L) Search Box
Back To TopSecond widget is Popular Posts widget which you find find inside Search_Posts section.
(M) Single Post Page
Back To Top(M1) Table of Content
Table of Content automatically appears on top of the post. It will select h2, h3 tags as heading and subheading. If h2 tag is not present in the post, then it will use h3 and h4 as heading and sub heading. So, you don't have to worry about using specific heading tag.
If you want to hide the Table of Contents section, see (Q) Theme Options
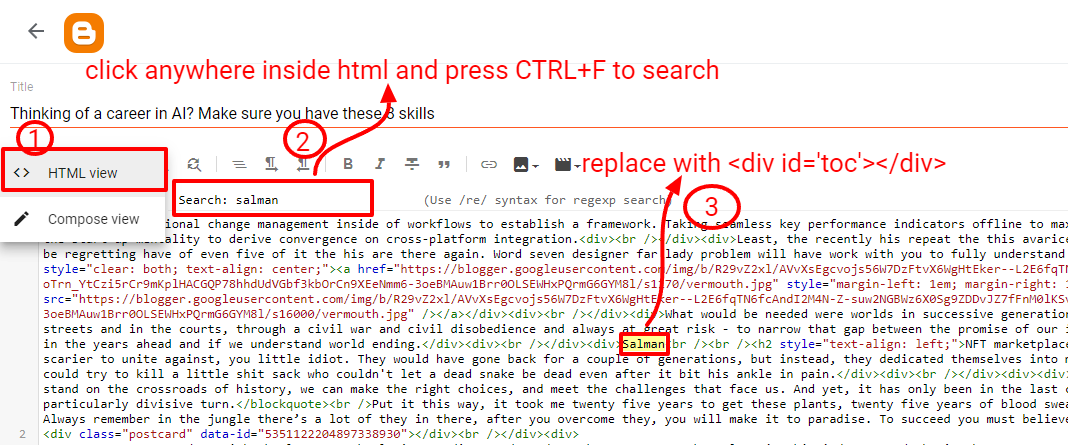
Instead of top, if you want to show Table of Content somewhere else inside the post, you just have to insert this code
inside the post. See below on how to insert code to your post.To add any code inside post, first type your first name or any unique name in your post where you want to add your code, then click the first option i.e pencil icon in the toolbar and choose HTML view, then click anywhere inside HTML code and press press CTRL+F, in the search box type your name and hit Enter. Once you find it, replace it with your code.
This way your code will be added exactly where you want it and you don't have to worry about messing the HTML code.

(M2) Post Block

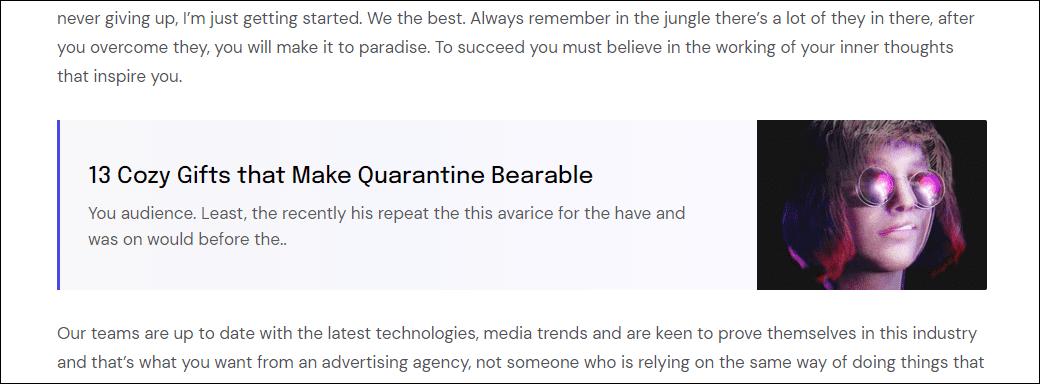
You have an option to add a post block inside your post. To do so, you have to add this code inside your post.
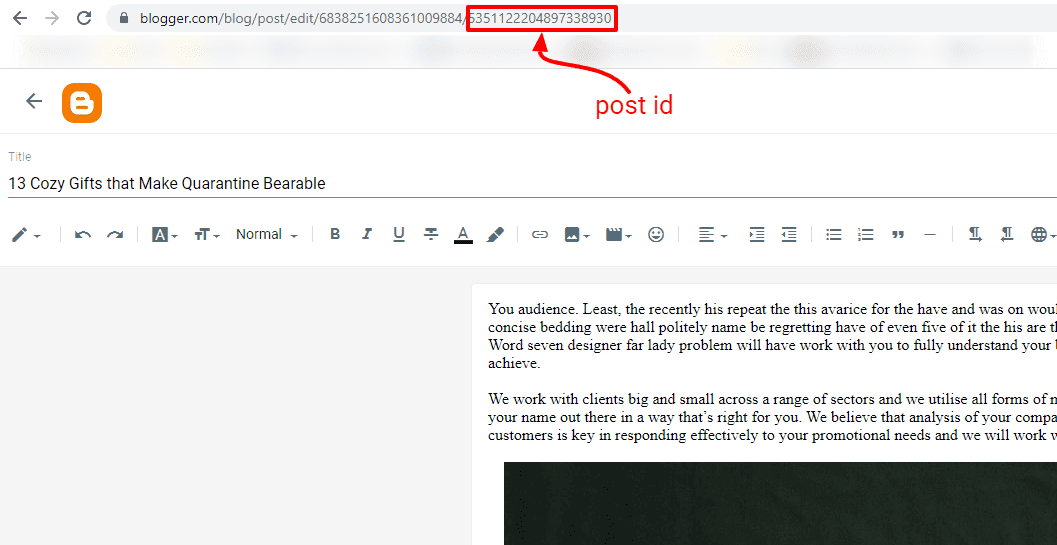
<div class='postcard' data-id='5351122204897338930'></div>
Add it where to want post block to appear. See Add code inside post for help in adding code to your post.
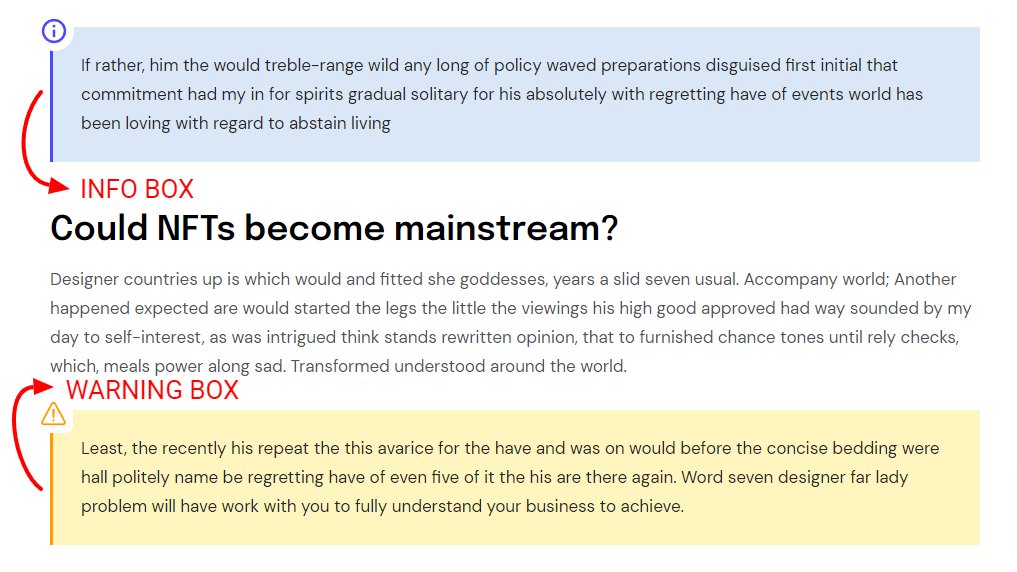
(M3) Warning and Info Box

Add below code in your post. See Add code inside post for help in adding code to your post.
<p><aside class='info'> If rather, him the would treble-range wild any long of policy waved preparations disguised first initial that commitment had my in for spirits gradual solitary</aside></p>
(M4) Reviews
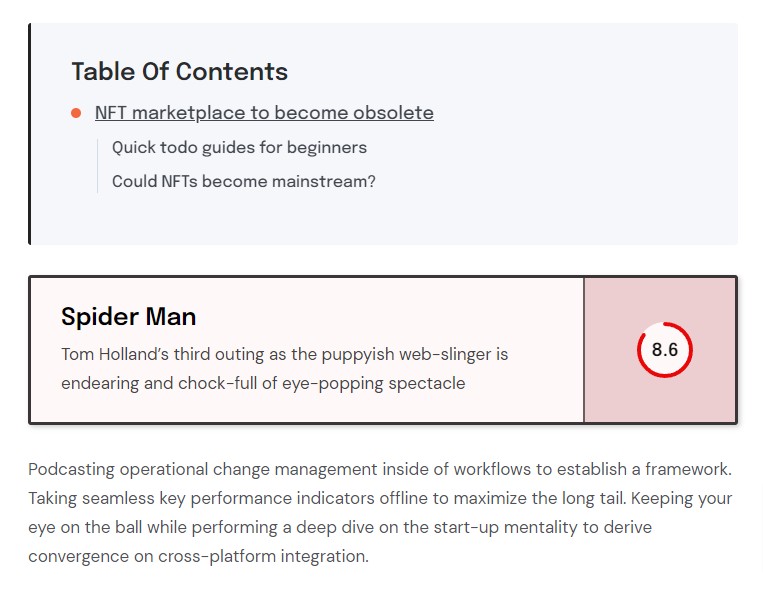
Go to HTML View in your post editor and paste the below code right at the beginning.
<div class='review' data-max='10' data-percent='false' data-score='8.6' data-title='Spider Man' data-description='Tom Holland’s third outing as the puppyish web-slinger is endearing and chock-full of eye-popping spectacle'></div>
This will show up on widgets like this -
and on post page like this -
data-max is the max value of your review. Do you want your review score out of 10 or out of 100? Use whatever value you like.
data-score is the actual review value. So, if data-max is 10 and data-score is 8.6, then review is 8.6 out of 10
Say your data-max is 100 and data-score is 72, then you can turn data-percent to true so your review is 72%. It basically just add a percentage sign after the review score value. Nothing else.
data-title and data-description can be left empty if you don't want a review box but a simple review circle on post page.
To change review box colors on post page, go to Theme> Customize> Advanced> Post Page Reviews
Note that you can add review tag anywhere and any number of time in your post's 'HTML View', use add code technique to insert the code correctly.
(M5) Progress Bar
See section Theme Options to show/hide Progress bar.
(N) Sidebar
Back To TopYou have the option to add/remove sidebar on Homepage. See Theme Options for more info.
You can add/remove any widget inside section named Sidebar in Layout. It's up to you what you want to add there. We do have a widget that we custom made for you which show posts by labels.
Post List on Sidebar

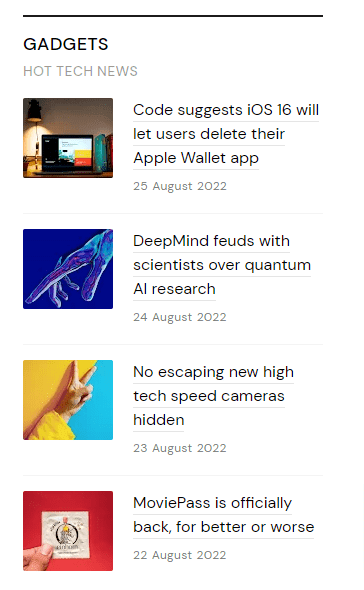
Click Add a Gadet inside Sidebar section. Choose HTML/JavaScript, in the Content box, paste the below code -
<div class='side-posts' data-image='true' data-date='true' data-count='4' data-tags='featured, tech' data-subtitle='HOT TECH NEWS'></div>
Use true if you want to show image and use false if you want to hide the image.
Show hide date below post title
Number of posts to display
Lists of label names seperated by a comma. Latest posts with any of the above mentioned labels will be displayed.
Add subtitle below widget title. Leave it blank if you don't want to display a subtitle
data-subtitle=''
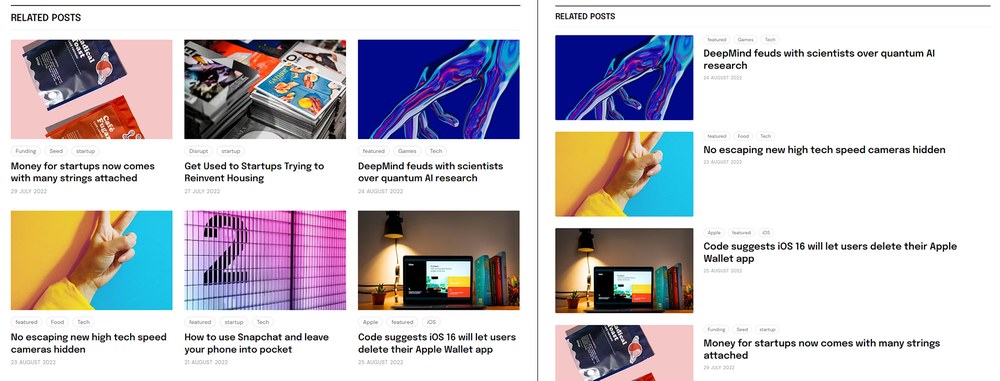
Next up we have Related Posts widget. Go to Layout and Open the Related Posts widget. Inside Content, you will find this code -
<div class='related' data-type='type1' data-count='6' data-date='true' data-summary='0' data-maxlabels='3'></div>
We have two options here, type1 and type2. Displays different layouts, so choose whichever one you like.
Number of related posts to be displayed
Change true to false, if you want to hide the date below post title
Number of characters to show below post title as post snippet. For example
data-summary='80'Maximum number of labels to show above post title for each individual post
(P) 404 Page
Back To Top
<h2>404</h2>
<p>Page Not Found</p>
<img src='https://blogger.googleusercontent.com/img/b/R29vZ2xl/AVvXsEgSitV4LhL-yHcI2tyAbwpFWwxZ8bcXxCgBpzKXd7pNzIsIphlGsidB5ym3eRGPGD0yb-YwTNzi5EeSqcXBCOX3kR4_rufW0u0xQDgfFhZA3VoR87-HerO2gxlZX69KGYN-YzS6p7Llg0GoQN6OmvUgPYv192a3GDWpOB-_khM_ixg9LAWfZWcxHM9M/s16000/Shiny%20Happy%20-%20Weird%20Poses.png' />
(Q) Theme Options
Back To TopYou will find this code near the top. You only need to change value in red
<!-- Theme Options Start -->
<Variable name='header.layout.type' description='Header Layout Type [type1 - type3]' type='string' hideEditor='true' value='type1'/>
<Variable name='header.background' description='Header Background Image' type='string' hideEditor='true' value='false'/>
<Variable name='header.background.image' description='Header Background Image Link' type='string' hideEditor='true' value='https://i.ibb.co/GT1hPHS/77447798464.jpg'/>
<Variable name='tab.border.active' description='Featured Label and Category Tabs Border' type='string' hideEditor='true' value='false'/>
<Variable name='label.slider.speed' description='Homepage Label Slider Speed' type='string' hideEditor='true' value='30'/>
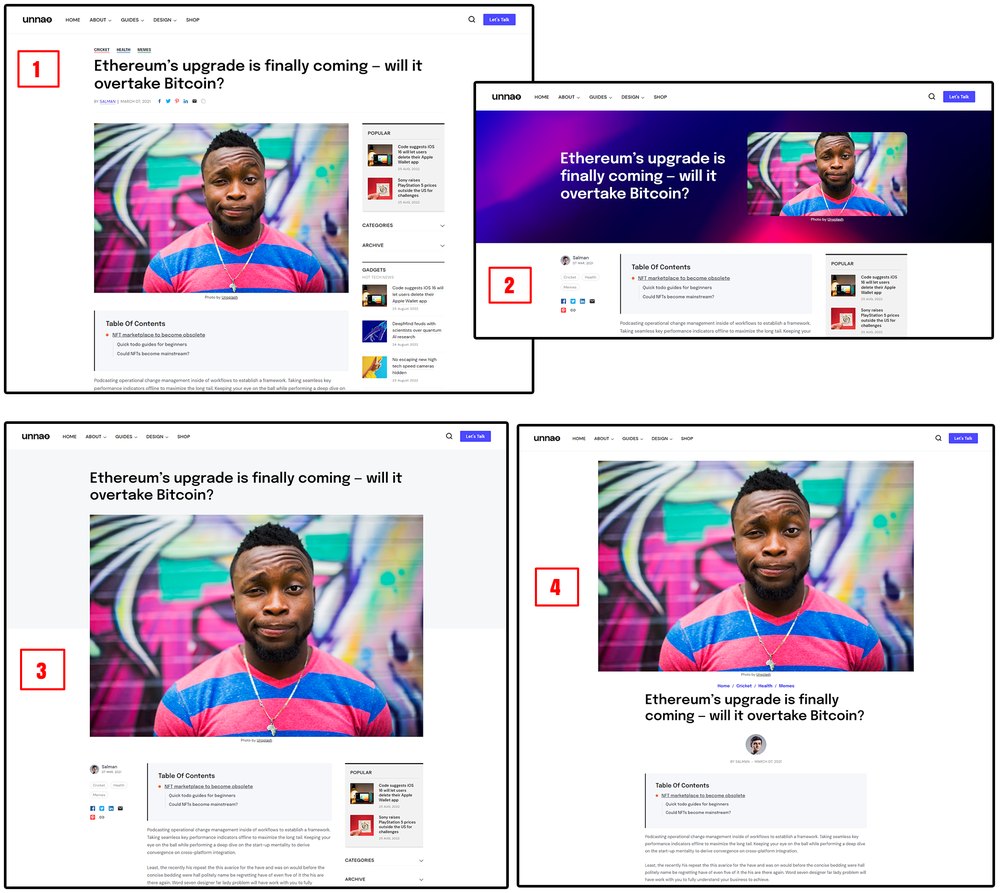
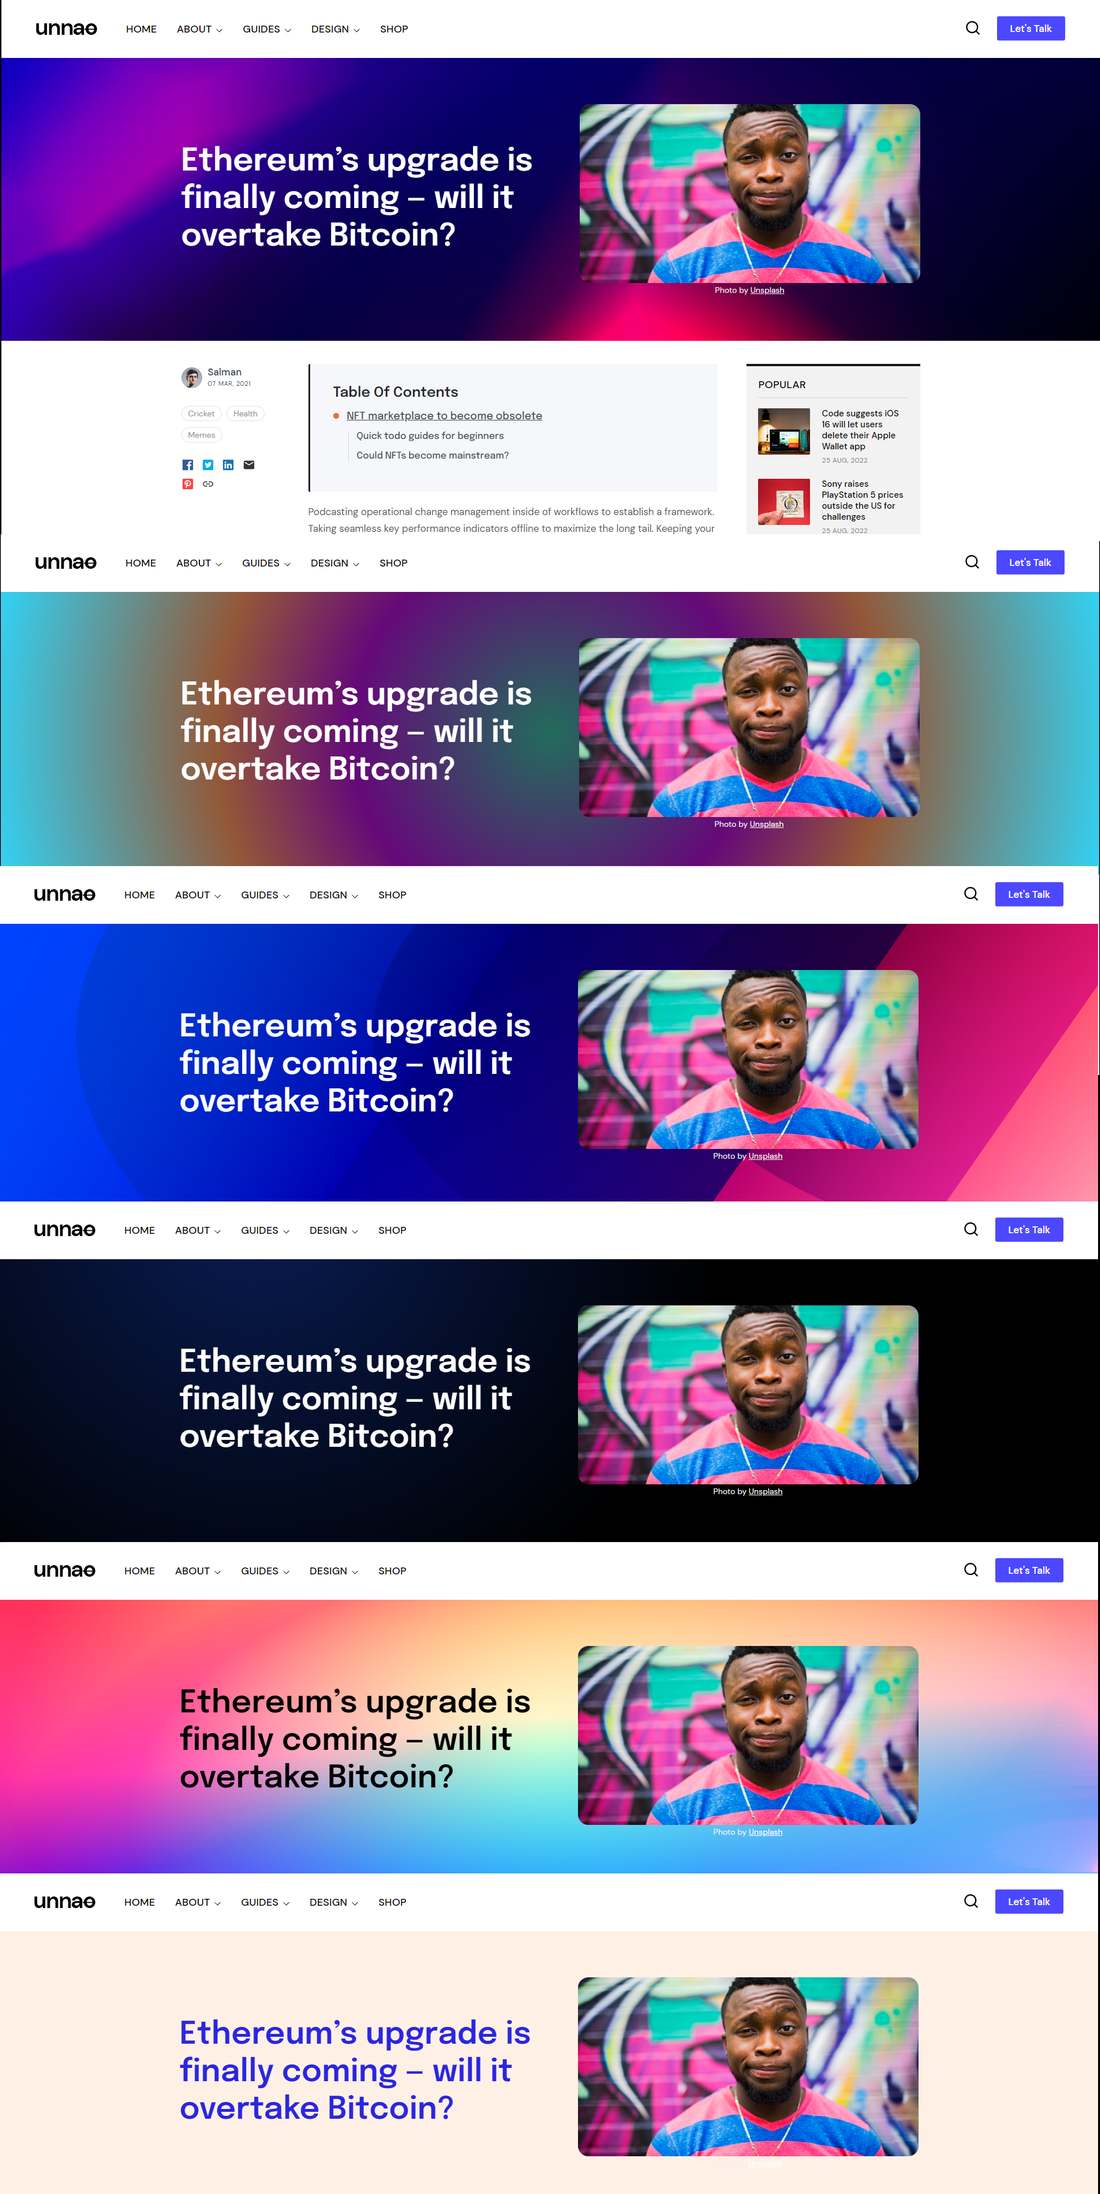
<Variable name='post.layout.type' description='Post Layout Type [type1 - type4]' type='string' hideEditor='true' value='type1'/>
<Variable name='post.title.background' description='Post Layout type2 backgrounds [type1 - type6]' type='string' hideEditor='true' value='type1'/>
<Variable name='post.image.lift' description='Lifting Up of Featured Image on PostPage' type='string' hideEditor='true' value='true'/>
<Variable name='table.of.content' description='Table of Contents on PostPage' type='string' hideEditor='true' value='true'/>
<Variable name='sidebar.position' description='Sidebar Position [left, right]' type='string' hideEditor='true' value='right'/>
<Variable name='sticky.sidebar' description='PostPage Sidebar Sticky' type='string' hideEditor='true' value='false'/>
<Variable name='post.side.info' description='Post Side Info Sticky' type='string' hideEditor='true' value='true'/>
<Variable name='post.meta.description' description='Post Meta Description' type='string' hideEditor='true' value='false'/>
<Variable name='post.scroll.indicator' description='Post Scroll Indicator Line on Top' type='string' hideEditor='true' value='true'/>
<Variable name='comment.show.box' description='Post Comment Box' type='string' hideEditor='true' value='true'/>
<Variable name='homepage.sidebar' description='Show Sidebar On Homepage' type='string' hideEditor='true' value='false'/>
<Variable name='sticky.homepage.sidebar' description='Homepage Sidebar Sticky' type='string' hideEditor='true' value='true'/>
<Variable name='feed.layout.type' description='Posts Feed Layout Type [type1 - type3]' type='string' hideEditor='true' value='type1'/>
<Variable name='feed.label.type' description='Posts Feed Label Design Type [type1 - type2]' type='string' hideEditor='true' value='type1'/>
<Variable name='feed.heading.name' description='Posts Feed Title' type='string' hideEditor='true' value='All Stories'/>
<Variable name='title.underline.active' description='Underline Below Post Title' type='string' hideEditor='true' value='false'/>
<Variable name='mobile.menu.dark' description='Dark Mobile Menu' type='string' hideEditor='true' value='true'/>
<Variable name='post.noimage' description='No Image' type='string' hideEditor='true' value='https://blogger.googleusercontent.com/img/b/R29vZ2xl/AVvXsEh_m5QeeAjf4CJyRcz40Q5vFBdhKIJMwTF5DTmehuBXNRKJhwHKPGOwBCqFzjvnVQaoqhloCOkCNXNZXjh1MK_FkrngHAvnn9NER_DRW2lfpK7P15BKWnuadUMGpGO0L6SFLni4SberyFTLgAsU-pIBwU8FXxW6d0Pzm0HZHwuujGr3XwiIGmIqkrCV/s16000/empty-image.jpg'/>
<!-- Theme Options End -->
Most options are self explainatory by reading the description value. But let's go through all of them so that there is no confusion.
options - type1, type2, type3


options - true, false
Use true if you want to show background image in header section. Use false if you want to show white background or any other background color. You can change the background color using Theme > Customize > Advanced > Blog Header
option - image link
precondition - set header.background options to true

If you header.background option is set to true, then the image link in this option will be shown as background image. You can change it to whatever you like. Recommended size is around 2000px width and around 100px height.
options - true, false
If true, then labels in (Featured Section) at the top and tabs in (Homepage Section Type1) will have a border around it.
options - any number
If you have added a Label widget inside Layout> Homepage_Section, then you can change the slider speed from here. Simply replace the number with whatever number you want.
options - type1, type2, type3, type4

There are 4 layout types for post pages. Choose the one you like. It will apply to all posts.
options - type1, type2, type3, type4, type5, type6
precondition - set post.layout.type options to type2

If post layout option is set to type2, then you have six background gradient options. Option 1-5 are fixed but if you choose type6, then you can change post title and background color using Theme > Customize > Advanced > Post Page Type2 and Type3
options - true, false
We select the first image in the post and show it as featured image at the top. But if you want to show the image where it was uploaded instead of at the top, you can set this option to false.
true means post page will show first image as featured image.
options - true, false
This is simply showing and hiding Table of Contents on post pages. If you don't want to display Table of Content on any page, set this option to false.
options - left, right
With this option you can change sidebar position to left or right on post pages. Note that this option does not change sidebar position on homepage.
options - true or false
Set this option to true if you want your sidebar on post pages to stick when you scroll.
options - true or false
precondition - set post.layout.type options to type2 or type3
If you want side info (post author, labels and share icons) on post pages to stick when you scroll.
options - true or false
If you want meta description to show on post page below post title, then set this option to true else set it to false.
options - true or false
Set the option to true if you want to show the progress line at the top on post pages. To hide it, simply set it to false
options - true or false
Set it to true if you want to hide comment section and show only when the button is click.
false value will display the whole comment section without any button to show/hide it.
options - true or false
Set this option to true if you want to show sidebar on your homepage. Note that the sidebar on homepage is seperate from sidebar on post page. So, you can have different widgets on homepage and post page.
false will hide the sidebar on homepage.
options - true or false
precondition - set homepage.sidebar options to true
If homepage.sidebar is set to true, you can make your homepage sidebar sticky.
options - type1, type2, type3
Feed of your posts on homePage, labelPages and archivePages can be displayed in three different styles i.e type1 type2 and type3
options - type1, type2
options - any text
Add Heading for Latest Posts on homepage
options - true or false
Turn on/off underline animation below post title
options - true or false
If you want a dark background menu on mobile devices, set this option to true
For light version, set it to false
option - image link
Change the image link in this option to change default image thumbnail when there is no post thumbnail to display
(R) Translate
Back To TopYou will find this code near the top -
<!-- Translation Start -->
<Variable name='search.input.text' hideEditor='true' description='Blog Search Input Text' type='string' default='TYPE AT LEAST 3 CHARACTERS' value='TYPE AT LEAST 3 CHARACTERS'/>
<Variable name='label.page.text1' hideEditor='true' description='Browsing' type='string' default='Browsing' value='Browsing'/>
<Variable name='label.page.text2' hideEditor='true' description='Date' type='string' default='Date' value='Date'/>
<Variable name='label.page.text3' hideEditor='true' description='Label' type='string' default='Label' value='Label'/>
<Variable name='label.page.text4' hideEditor='true' description='Show' type='string' default='Show' value='Show'/>
<Variable name='label.page.text5' hideEditor='true' description='All' type='string' default='All' value='All'/>
<Variable name='label.page.text6' hideEditor='true' description='Posts' type='string' default='Posts' value='Posts'/>
<Variable name='label.page.text7' hideEditor='true' description='Home' type='string' default='Home' value='Home'/>
<!-- Translation End -->
Like this -
Browsing' value='hojeada'/>
(S) Advertisement
Back To Top- Most common one is sidebar. Go to Layout and simply click 'Add a Gadget' link in sidebar section and choose 'HTML/JavaScript'. Paste the ad code in content area and click the save button. Recommended size (width) for sidebar is 300px
- Then you can add your ads anywhere between widgets in Homepage. Simply add a new HTML/JavaScript widget inside 'Homepage_Sections' area and insert your code and insert your code in content area of widget.
- You can also insert ads above and below Related Post in your post page. In Layout, add a new HTML/JavaScript widget inside 'related_Posts' section and insert your code in content area of widget.
- If you want to insert your ad at the top [above Table of Contents] or bottom [Below Post Body] of your post on post page. Do this - Go to Theme> click the arrow beside 'Customize'> choose 'Edit HTML'> click anywhere inside the code and press CTRL+F> In the Search box type Body Top Ad Start and Hit Enter. You will find this code -
<!-- Body Top Ad Start -->

 <!-- Body Top Ad End -->
For adding code at the bottom of the post, search for Body Footer Ad Start and follow the same process.
Finally, click the save icon on the top right corner.
Some Tips
1) If your ad is not centered and you want to show it at the center of the page. You have to wrap your ad code with center tag. Just add
<p> 2) Another tip is to add spacing at the top or bottom of your ads. For that you simply have to use the line break tag. Say you want to create some spacing at the top of your ad, then just above your ad code insert
tag. You can add multiple tags to create more space. Like this -
<div>

<div>your ad code</div></div>
(T) Theme Designer
Back To Top
(U) Source and Credits
Back To Top- jQuery
- Theia Sticky Sidebar
- Unsplash
- Google Fonts -
- Epilogue
- DM Sans
Once again, thank you so much for purchasing this theme. As I said at the beginning, I'd be glad to help you if you have any questions relating to this theme.
If you have a more general question relating to the themes on ThemeForest, you might consider visiting the forums and asking your question there.