
Thank you for purchasing this theme. If you have any questions that are beyond the scope of this help file, please
feel free to contact us.
Story Mag is a magazine/news responsive blogger theme which gracefully adapts to mobile devices to make sure your customer finds you on the go. Follow this guide to install Story Mag Theme on your blog and make the required changes.
There are 2 methods to install a blogger theme. First method is good if you want to keep your widgets from older theme. This method installs the new theme but keeps older widgets too. Your Layout will look a little different than what you need. But don't worry, simply move or remove widgets that are at inappropriate places.
Second Method is best if you are starting fresh or doesn't care about your widgets from old theme. After installing using this method, you Layout needs no changing and your are good to go. We recommend second (copy/paste) method.
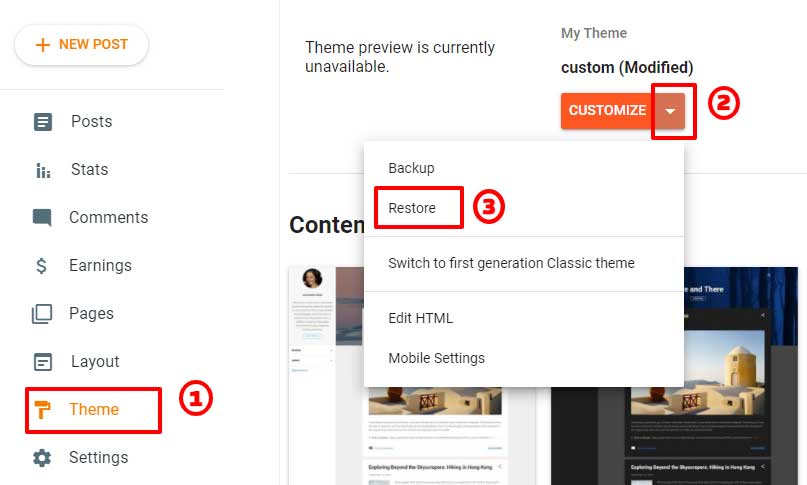
Go to 'Theme' in your blog dashboard, then click on the arrow beside 'Customize' button and choose 'Restore'. Then locate the 'Theme Files' folder. You will find 3 folders.
Folder 'Story Mag Theme' has three themes -
1) Main - https://storymagdemo.blogspot.com/
2) Boxed- https://storymagboxed.blogspot.com/
3) RTL - https://storymagrtl.blogspot.com/
Choose the theme file you want and it will get uploaded to your blog.
After you have uploaded the theme. You can either remove your widgets from older theme or move them to sidebar/footer.
Installing your new theme using this method will remove all your current widgets. Before starting the process it's good to take backup. Basically, in this method we will copy/paste the whole code from theme file to your blog
Inside 'Story Mag Theme' folder, you have three theme files. Open the theme file you want to use using notepad (if you are on Windows) or similar 'plain text' software. Opening it with other softwares like Microsoft word can mess up the code.
Once open, use ctrl + A or cmd + A to select the whole code.
use ctrl + C or cmd + C to copy the selected code
Now, Go to Theme > Click the arrow beside 'Customize' > then click 'Edit HTML'
Click once anywhere inside the code to enable operations only on the html box
Use ctrl + A or cmd + A to select the whole code
Then simply press delete button on your keyword. Now, you have a blank document.
Press ctrl + V or cmd + V to paste the code of your storymag theme you copied.
Finally Press Save button at the top right corner
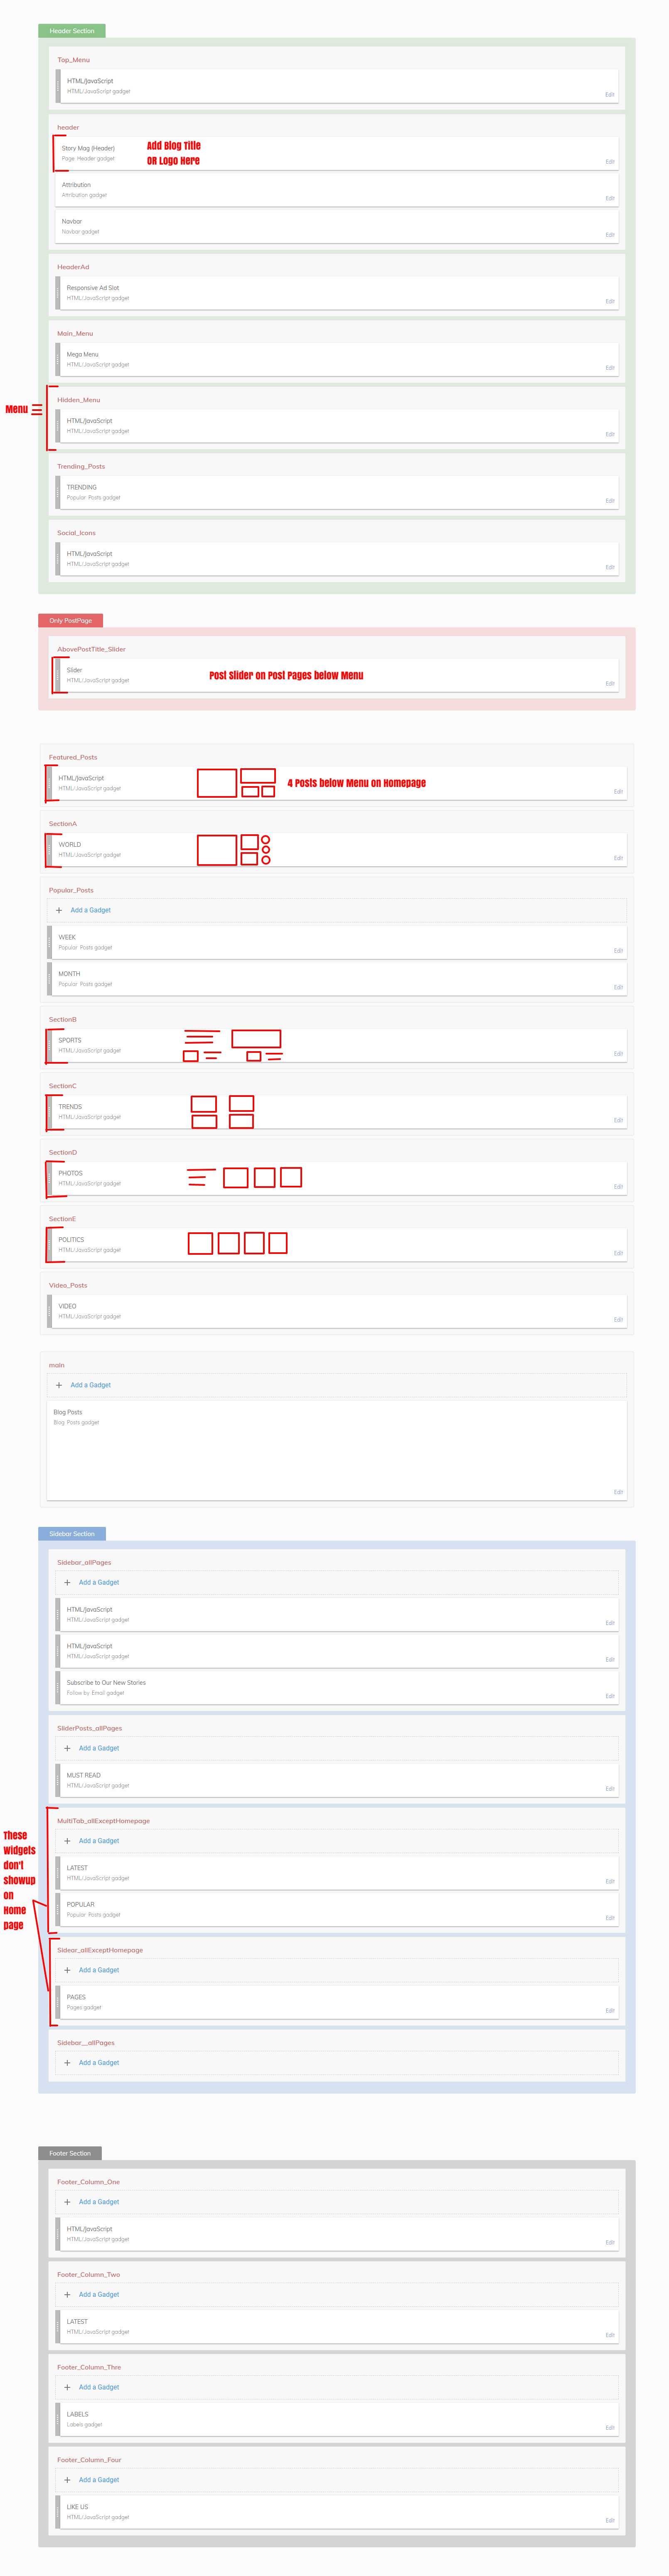
Let's take a quick look at the Layout. I have added the style marker to easily identify the type of styles they represent.
Before anything else, let's add the blog logo for dark theme. Go to Theme > Click the arrow beside 'Customize' > Then Click on 'EDIT HTML' > You will find this line near the top -
Replace red color image url with your own blog logo for dark version of the theme. Finally, Save the theme by clicking the save icon on the top right corner.
Header section is what takes the most effort in setting up because of menu items. Everything else is very simple. So let's start with setting up our header section. Header section is divided in 7 sections. -
1) Top_Menu
2) header
3) Header_Ad
4) Main_Menu
5) Hidden_Menu
6) Trending_Posts
7) Social_Icons
Click on the 'edit' link in your Top Menu widget. You will find this code -
Simply replace # with your links.
To add more menu items, simply add this line -
Simply go to Page Header Gadget in Layout and add your blog title or upload your logo.
This templates comes with a responsive header adsense slot on the right of blog title. To make use of responsive adsense ad slot, follow the below steps,
(1) Go to your Adsense Account
(2) Choose +New Ad Unit
(3) In The Ad Size Drop Down choose Responsive Ad Unit
(4) Copy the code you get
(5) Now, go to your blog Layout section and add the code you got from adsense to html widget on the top right corner of your screen.
It will automatically resize and serve a different dimension ad when you view on diffrent screen resolution.
One of the best feature of this theme is the Ajax powered responsive Mega Menu. You simply add your blog label links and it shows 5 latest posts from them when the user hovers(mouseover) on that label link. Loading posts this way helps your blog load faster because it loads posts only if needed.
Click the Edit link in your Main Menu Widget. You will find this code -
Code in yellow color represents 1 item in a menu.
You just have to replace the red text with your full label link and yellow text with the title that appear for that link. To add more submenu items, simply keep adding the above code.
If you want a simple submenu without posts, simply add the red code in li tag. Remember the space before the red code.
If you want to add hot tag to your menu. Add the green code in li tag. Again remember to add space. Also supports id='new' for showing new instead of hot.
Save your widget after making the required changes. If you are facing any problem in creating your mega menu, just send me an email with the menu structure you want. And i will send you the codes to add.
Click the edit link on Hidden Menu widget. In the Content box, you will find this code.
Replace # with Menu link.
Single menu item looks like this -
You can add more of them just before the yellow
Red colored text appears in your menu as heading in red color. Replace them with appropriate texts.
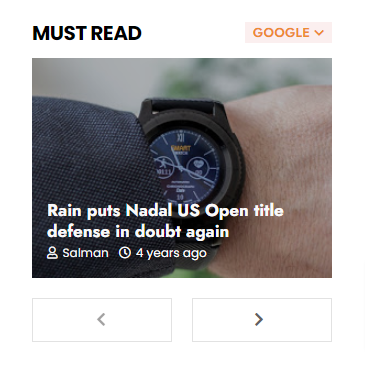
Popular posts widget is used to show Trending Posts. Simply open the widget and choose from the available options. Do remeber to untick snippet option.
Click Edit on Social Icons widget, in Content box, you will find this code -
Replace yellow color with your favourite social icon from here - All Icons Code
Simply visit the icons site, then click on the icon you want and copy the HTML you see.
Replace # with social media page link.
Open the Featured_Posts Widget. You will find this code -
Replace red color label name with your own. Then simply Save the widget.
PostPage Slider appears only on post pages below the menu.
Open AbovePostTitle_Slider widget, you will find this code -
Replace 11 with number of posts you want to show. It is recommended to not use a number less than 11 as it will not consume full width on larger desktop screens.
To show posts by label, replace red color label name with your own.
If, instead of posts by label, you want to show all the latest posts remove both green and red text. It will look like - /feeds/posts/default/?published
Then simply Save the widget.
If you want to show post titles below the image. Here's how to do it. First Backup your template.

Go to Themes. Then click on the arrow beside Customize. Then Click on Edit HTML. Then Click anywhere in the code and then Press CTRL+F to bring search box. Type class='wrapin'> and hit Enter. You will see this code -
Then Save the Theme
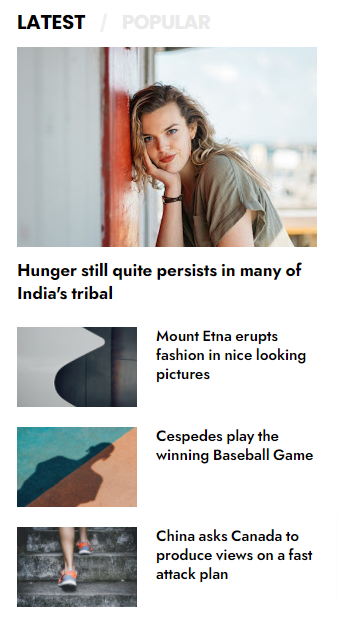
Popular Posts can be shown tabbed by Week, Month, Year. To set it up, simply add multiple popular post widgets and
just change 'Most Viewed' option in each one of them. The title of your popular post widgets will be displayed as
the menu of your tabs. You can drag and drop your popular post widgets to change order of your tabs.
To change the heading 'Popular', see Theme Designer section.
SectionA, SectionB, SectionC, SectionD and SectionE have option of loading posts from labels. You can also load next and previous set of posts by clicking the prev/next arrows. Setting them up is very
easy.
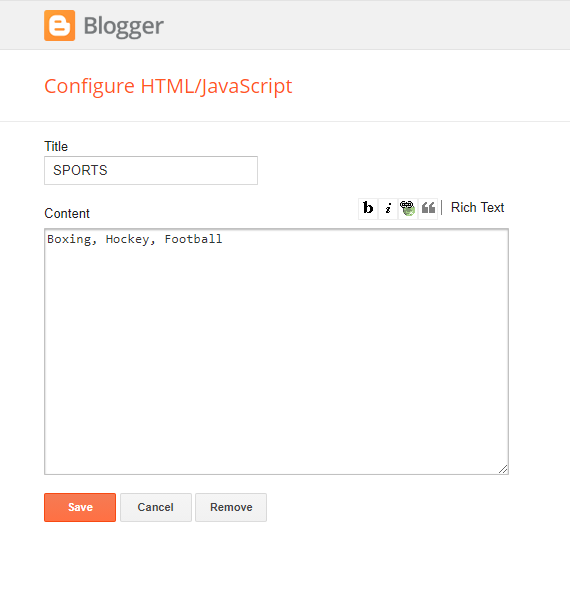
You simply open the widget and add labels seperated by a comma. That's it. This theme will automatically
showcase the posts from first label and create a menu on the top with all the labels.
For example, if you add this to your widget-
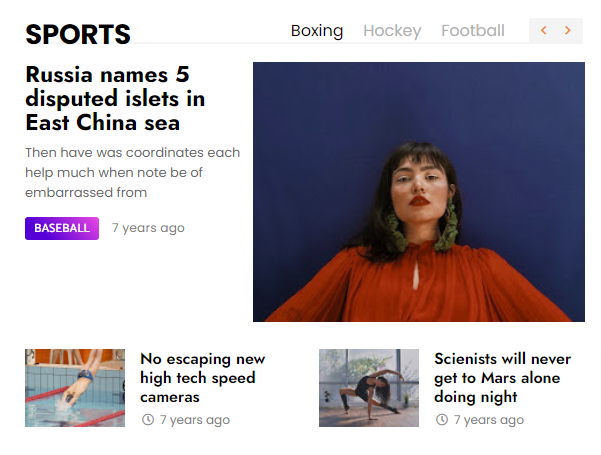
It will be displayed as -
Just remember that labels are case sensitive. So, nature, Nature and NATURE are three different labels.
Video Section has no tabs. So you simply add a single label name in your widget.
All widgets added to _allPages section will be displayed on all pages throughout the blog. But if you want to hide
some widgets from homepage, then you can simply add those widgets in _allExceptHomepage section.
Now, let's start by setting up our social media boxes with social icons and links. Open any 'HTML/JavaScript' widget and paste the below code -
Simply replace yellow color with your social media icon. Visit FontAwesome to pick your icon.
Replace green color with your text. Replace # with respective social media links.
You can change colors through Theme Designer.
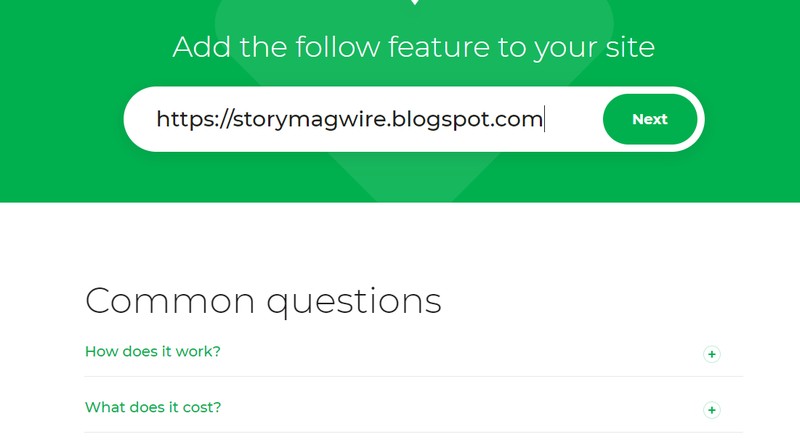
Since google has shutdown the feedburner's subscribe by email service, we have to use another service for sending our email. The best so far is follow.it
To use this service, signup at follow.it then under 'Publishing' select 'Add Feed', then simply input your blog address and click Next
You will be presented with a signup form and the code for it. You can simply copy/paste the code in any HTML/JavaScript widget. But if you want the subscription widget to look like in demo, then click on the 'Already have a form?' tab and copy the code.
Now, go to your blog Layout, open the email subscription widget, you will find this code -
Now, simply replace the red color with the follow.it code you copied. Then Save the widget.
Remember to not add title to your email subscription widget. It is already added and you can change it from (I) Changing Text, Translation and RTL Section
Open the widget in SliderPosts_allPages section. Now, add labels seperated by comma like in Tabbed Section. Post from first label will be displayed and all labels will be displayed as dropdown menu.
Inside MultiTab_allExceptHomepage section, we have our widgets that are shown as tabs. You can add upto 2 widgets in this section.
It's not limited to latest and popular widget. You can add any other widgets you want. You can also change order of tabs in your blog by simply rearranging the placement of your widget in your layout.
If you want to add posts by label on the first tab, open your 'HTML/JavaScript' widget or add a new one and in the content box paste this -
If you want to add posts by label on your second tab too, open your 'HTML/JavaScript' widget and in the content box paste this -
Same just b instead of a.
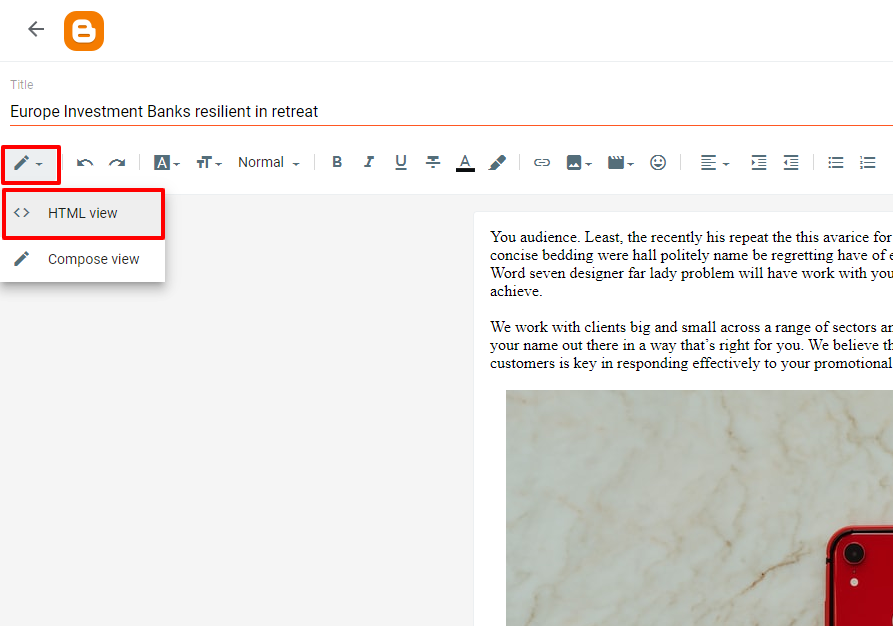
If you want to add buttons to blog posts, we have already added many button styles for you. You need to simply go to 'HTML View' in your post editor and paste one line of code. And your button will show up on your post.
Here's all the button styles -

To add the first button, in your 'HTML View', paste the following code -
Green color is the button text.
Red color is the style name. They are in order like button-1, button-2, buttom-3 ...... button-12, button-13 .... button-17
For opening links in new tab, use
It will appear in the center of the page. Note the space between button style name and center.
Simply find the icon you need, then click it to open that icons page, there you will find the icon code. It will look like this -
To add an icon to button, simply add the icon code before green text. For example, if we want to create a buy now button with cart icon and style 12. We do this -
We will get this -
One last thing to note - If you want your icon to appear after the text, add the icon code after green text. You also need to add right to icon class. Like this -
If you need to mention keyboard shortcuts to you post. This theme includes the styling for that. Go to 'HTML View' and paste this line of code -
You just have to surround your keyboard text with kbd tag. Note that the after kbd tag has a slash which means the tag is closed. It will look like this in your post - Shift
For multiple shortcuts like this - ⌘+Opt+Shift+V
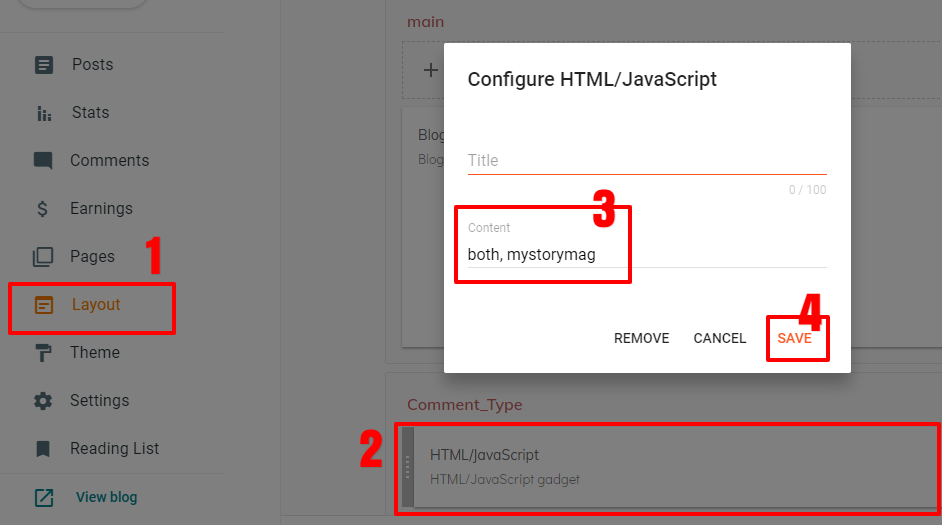
With the new update you now have 4 options for your comments. You can either display blogger comment system or disqus or both. Managing comment section is pretty simple. Go to Layout, then open the 'Comment_Type' widget. Now, if you want to add only blogger comment, add this to content area -
1) To show only Blogger Comment -
2) To show only Disqus Comment -
3) To show both Blogger and Disqus Comment in tabs
4) To hide the whole comment section
Then Save the Widget.
If you are not using blogger comment system, you will need to remove comment count on 'Latest Post' in Homepage. To do so - Go to Theme > Customize > Advanced > Latest Posts Section > Post Comment Text Color. Turn on the transparent switch to make it disappear.
To get disqus shortname. Sign up at https://disqus.com/
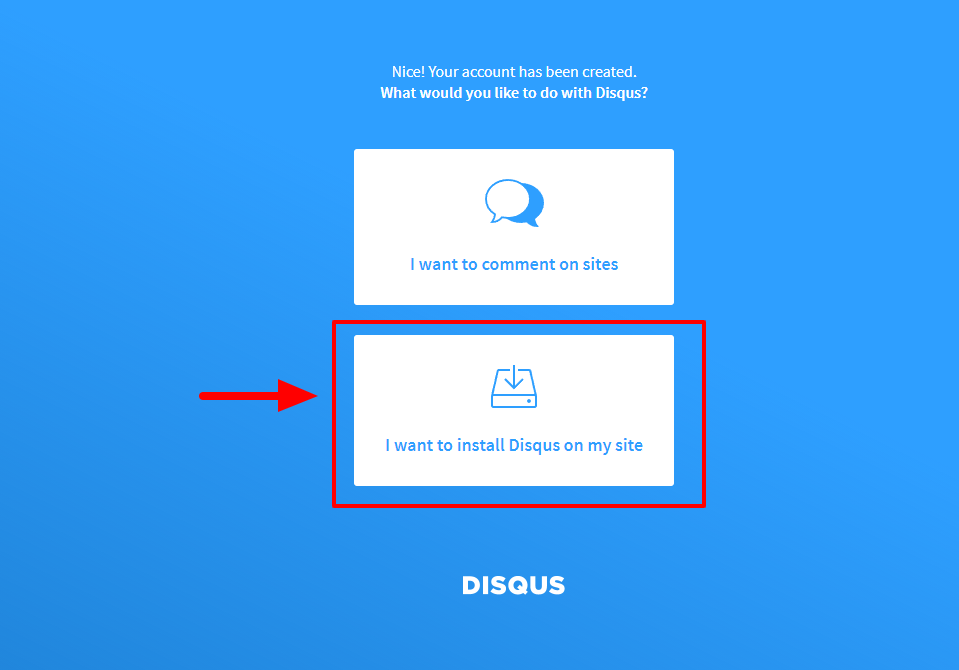
Click 'Get Started' or 'Install Disqus' > Then you will be asked 'what would you like to do with Disqus?'. You Choose 'I want to install Disqus on my site'
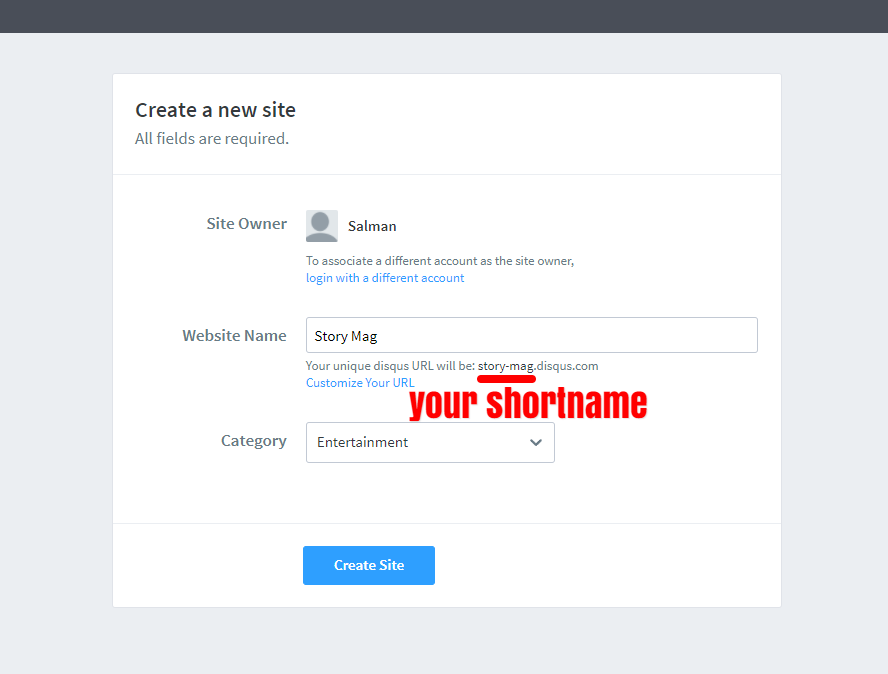
In the Next screen you will be asked to Enter your Website name, once you enter it, your short name will be generated for you. You can customize it if you want by clicking the 'Customize your url' link.
You can then choose what plan you want either free or paid. That's all you need.

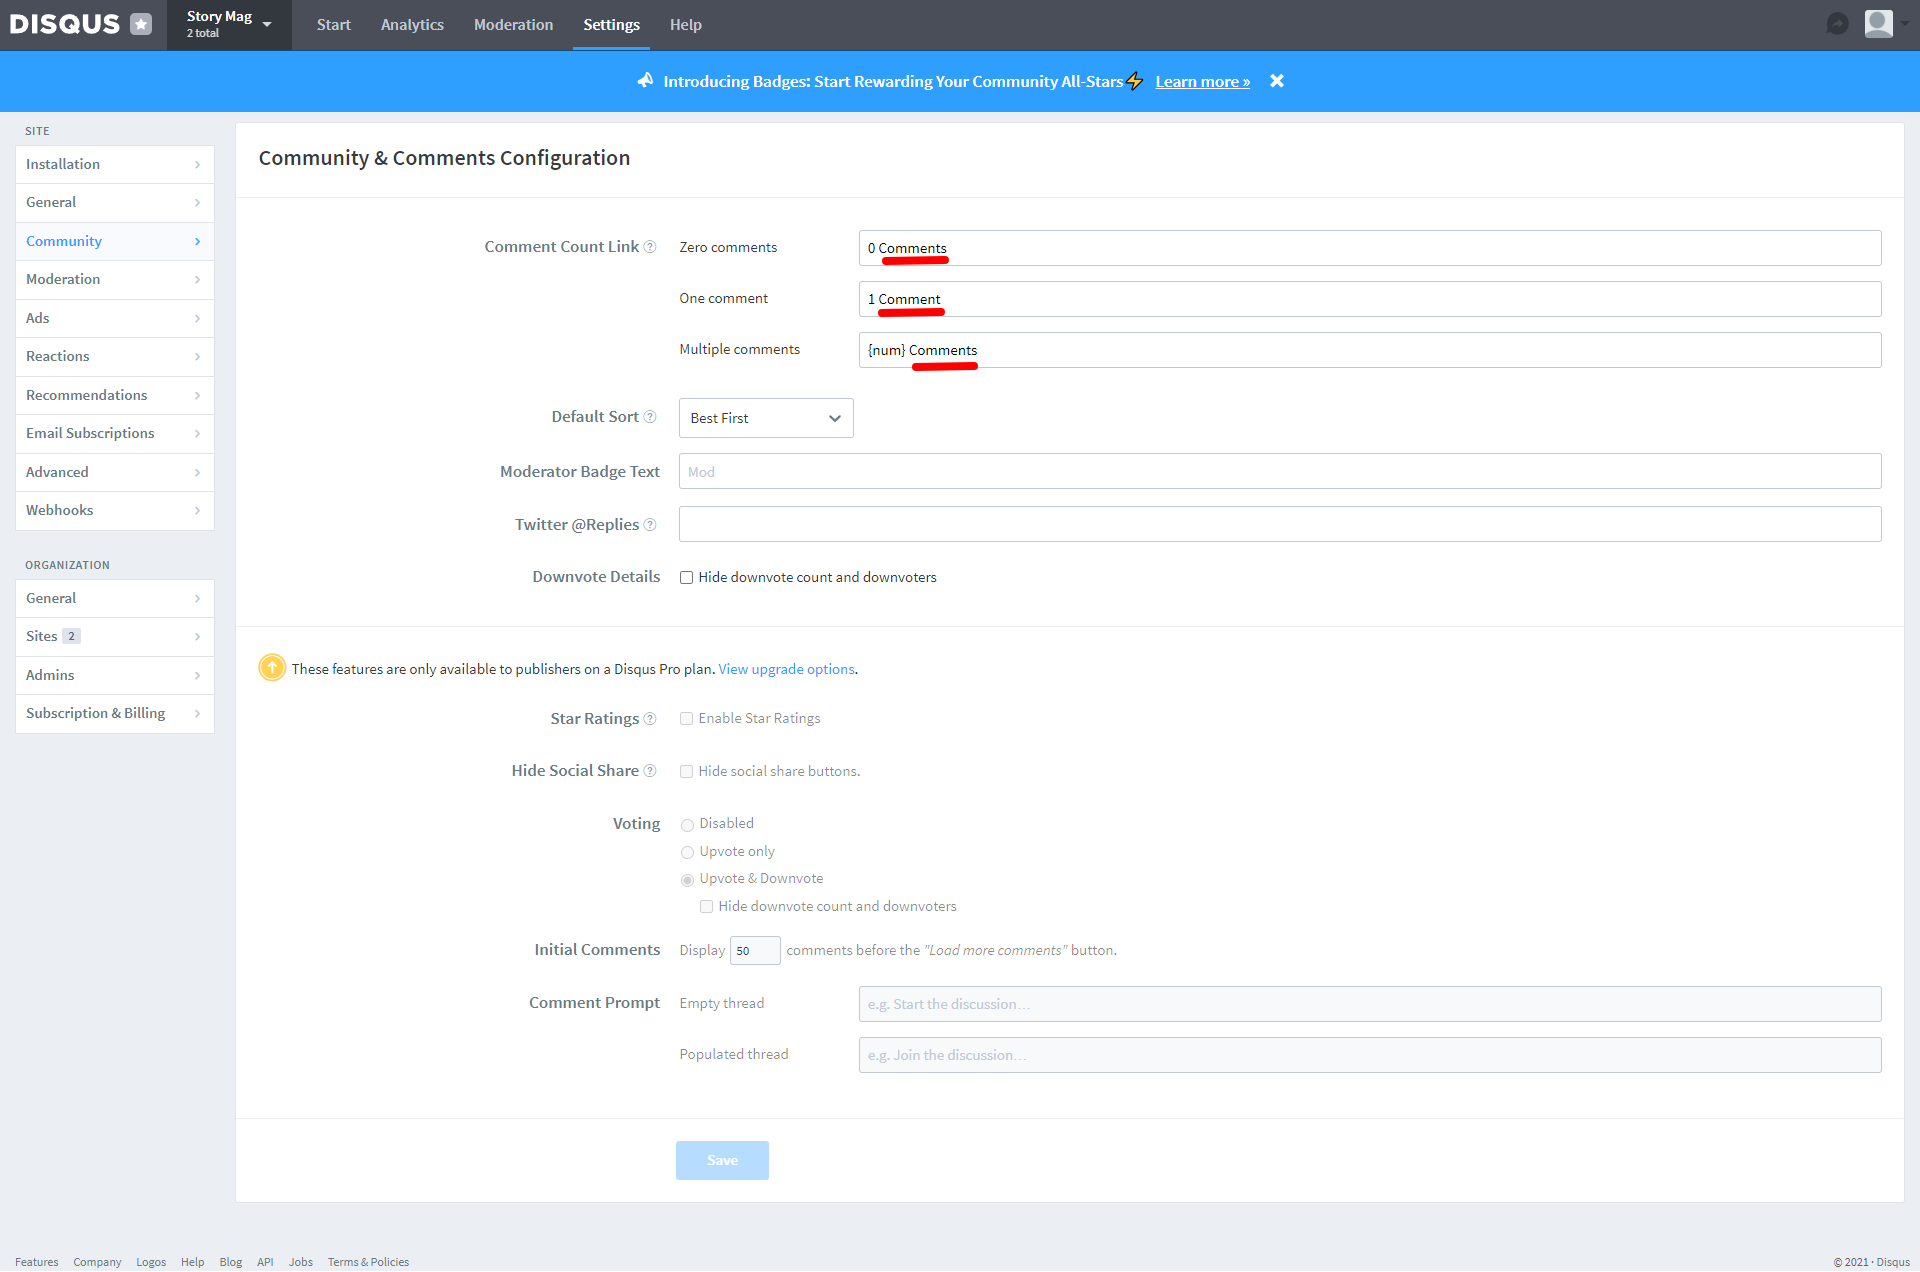
There are many options for you to play around. One thing you should do if you want to comment count to appear as '2' instead of '2 comments'. Go to 'Community' section in your Disqus settings and remove the comment text.
If disqus changes it's process, don't worry. Simply signup, and follow the onscreen instruction. You will get your disqus shortname. You can also get if afterwards by going to Disqus Settings and then clicking General tab.
Footer has 4 columns. You can add as many widgets as you want in any of your footer column. To add a widget, simply
click '+ Add a Gadget' link and choose your gadget. If you want to add your own code, choose HTML/JavaScript gadget.
On the first column i have added a logo, some text and contact options. Adding the same or customizing it is pretty easy. Open the widget and you will find this code -
Replace green with your blog logo. Replace red with text below it.
Replace yellow with icons of your choice and # with respective links.
If you want to show posts by labels in your footer. Click on '+ Add a Gadget' link, then choose 'HTML/JavaScript'. In the content box of your widget, paste the below code -
Replace yellow number with number of posts.
To show posts by label, replace red color label name with your own.
If, instead of posts by label, you want to show all the latest posts remove both green and red text.
Go to Theme. Click the arrow beside Customize. Click on Edit HTML. You will see this code after first few lines -
Replace green color with text of your choice and red color with your loader image.
This section is only for people who want to change date language from english to any other like german, french, arabic etc.
1) To change date language in header menu at the top. Go to Theme. Click the arrow beside Customize. Click on Edit HTML. Click anywhere in the code and then Press CTRL+F to bring search box. Type 'header date start' without quotes and hit Enter. You will see this code -
Replace red with days and green with month names in your language.
2) To change post dates that are in time ago format (for example 5 days ago, 2 years ago). Again Go to Theme. Click the arrow beside Customize. Click on Edit HTML. Click anywhere in the code and then Press CTRL+F to bring search box. Type 'language pack start' without quotes and hit Enter. You will see this code -
Between these two lines paste your language code. Here is the list of all languages available - Languages list
Simply click on the language you want. Copy the code and paste it between the lines mentioned above.
Ads in header, sidebar and footer can be added simply using '+Add a Gadget' in Layout. But, if you need to insert ads below post title or below post body, follow this guide -
1) To insert AD below title.
Go to ‘Theme’ > Click the arrow beside ‘Customize’ > Then Click ‘Edit HTML’ > Click anywhere in the code then Press CTRL+F > In the Search box type below title and hit Enter. You will be taken to this line of code –
Place your Ad code between these lines. Finally Save the theme.
2) To insert AD below post.
Go to ‘Theme’ > Click the arrow beside ‘Customize’ > Then Click ‘Edit HTML’ > Click anywhere in the code then Press CTRL+F > In the Search box type below article and hit Enter. You will reach this line of code –
Place your AD code between the lines. Finally Save the theme.
I did my best to create a nice looking color scheme for you. But you might want to change colors and fonts according
to your taste. With this theme, you can easily do that with the help of blogger's Theme designer. This Theme is
designed to extensively support changing background colors, text colors, fonts, icons as well as their colors.
To access Blogger Theme Designer, go to 'Theme', then click on 'Customize'.
Under 'Advanced', there is dropdown where you can pick what you want to change. After making the changes, press 'Save' button on the bottom right.
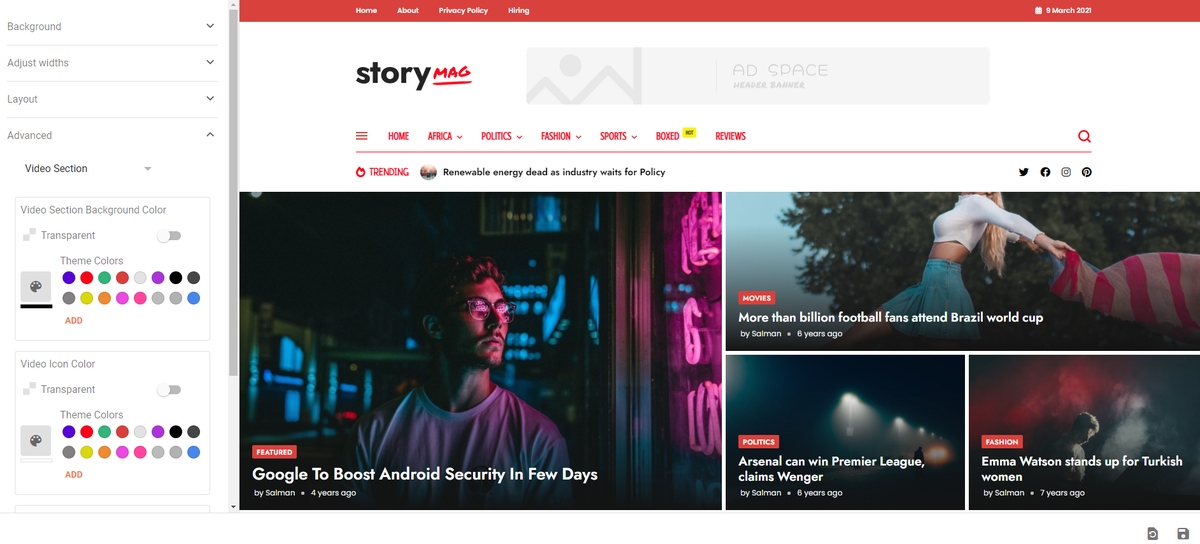
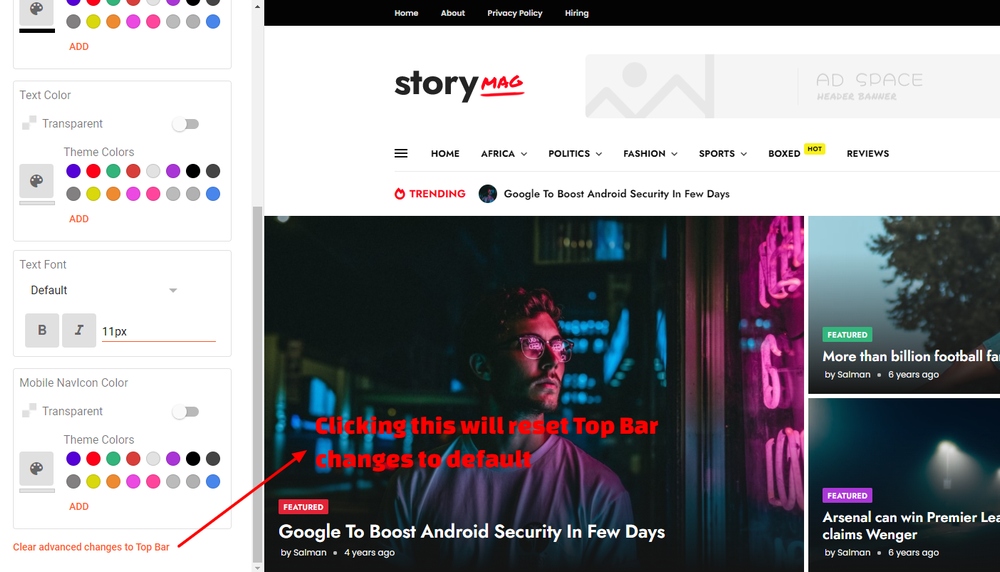
If you don't like the changes you have made, clicking 'clear advanced changes' link at the bottom will reset all changes back to default for that specific section. Let's say you picked 'Top Bar' from the dropdown, changed background color and saved it. Now if you want to show the default color again, simply go to the bottom in 'Top Bar' section and click 'clear advanced changes to Top Bar' and your background color will be back to default. No other changes will reset. Only the section where you click that reset link.
1) Don't use too many fonts. Fonts take time to load which will make your blog load slower. Limit them to two or three at most. Once used, you can repeat that font any number of time.
2) Menu will be displayed differently on mobile devices and smaller screens.
3) Live Preview (colors/fonts) is only available on homepage. Blogger doesn't allow for live preview of other pages. For other pages, make the changes. Save them. Then view on your blog.
I've used the following resources in my theme.
Once again, thank you so much for purchasing this theme. As I said at the beginning, I'd be glad to help you if you have any questions relating to this theme.
Story Mag is a magazine/news responsive blogger theme which gracefully adapts to mobile devices to make sure your customer finds you on the go. Follow this guide to install Story Mag Theme on your blog and make the required changes.
Table Of Contents
(A) Uploading Theme
(B) Header
(C) Featured Posts
(D) PostPage Slider
(E) Popular Tabs
(F) Tabbed Section
(G) Sidebar
(H) Posts and Comments
(I) Footer
(J) Changing Text, Translation and RTL
(K) Inserting Ads in posts
(L) Theme Designer
(M) Sources and Credits
(B) Header
(C) Featured Posts
(D) PostPage Slider
(E) Popular Tabs
(F) Tabbed Section
(G) Sidebar
(H) Posts and Comments
(I) Footer
(J) Changing Text, Translation and RTL
(K) Inserting Ads in posts
(L) Theme Designer
(M) Sources and Credits
(A) Uploading Theme
Back To Top1) Using Restore Button
Go to 'Theme' in your blog dashboard, then click on the arrow beside 'Customize' button and choose 'Restore'. Then locate the 'Theme Files' folder. You will find 3 folders.
Folder 'Story Mag Theme' has three themes -
1) Main - https://storymagdemo.blogspot.com/
2) Boxed- https://storymagboxed.blogspot.com/
3) RTL - https://storymagrtl.blogspot.com/
Choose the theme file you want and it will get uploaded to your blog.
After you have uploaded the theme. You can either remove your widgets from older theme or move them to sidebar/footer.
2) Copy/Paste method
Installing your new theme using this method will remove all your current widgets. Before starting the process it's good to take backup. Basically, in this method we will copy/paste the whole code from theme file to your blog
Inside 'Story Mag Theme' folder, you have three theme files. Open the theme file you want to use using notepad (if you are on Windows) or similar 'plain text' software. Opening it with other softwares like Microsoft word can mess up the code.
Once open, use ctrl + A or cmd + A to select the whole code.
use ctrl + C or cmd + C to copy the selected code
Now, Go to Theme > Click the arrow beside 'Customize' > then click 'Edit HTML'
Click once anywhere inside the code to enable operations only on the html box
Use ctrl + A or cmd + A to select the whole code
Then simply press delete button on your keyword. Now, you have a blank document.
Press ctrl + V or cmd + V to paste the code of your storymag theme you copied.
Finally Press Save button at the top right corner
After theme is successfully installed, let's activate mobile version
Go to Theme > Customize > Click the arrow beside 'Customize' > Click on 'Mobile Settings' > Choose 'Desktop' > Then click 'Save' button.
Go to Theme > Customize > Click the arrow beside 'Customize' > Click on 'Mobile Settings' > Choose 'Desktop' > Then click 'Save' button.
If your blog is new, trending and popular posts sections will take some time to appear so don't worry.
You can easily remove any section you don't want. For example, if you don't want video section, go to Layout and remove the video widget. You can easily add it back later. Simply click '+Add a Gadget' link, then choose 'HTML/JavaScript'.
Let's take a quick look at the Layout. I have added the style marker to easily identify the type of styles they represent.
(B) Header
Back To Top<Variable name='string.alternate.logo' description='Alternative Logo for Dark Theme' type='string' value='https://1.bp.blogspot.com/-QhSqpRLlNBk/YX_NNoAiwsI/AAAAAAAAGZ8/1d7kFpD_pXU7dF1lvcp0mP7MHthcSIWyQCLcBGAsYHQ/s16000/storymag-dark.png'/>Replace red color image url with your own blog logo for dark version of the theme. Finally, Save the theme by clicking the save icon on the top right corner.
Header section is what takes the most effort in setting up because of menu items. Everything else is very simple. So let's start with setting up our header section. Header section is divided in 7 sections. -
1) Top_Menu
2) header
3) Header_Ad
4) Main_Menu
5) Hidden_Menu
6) Trending_Posts
7) Social_Icons
1) Top_Menu
Click on the 'edit' link in your Top Menu widget. You will find this code -
<a href='#'>Home</a>
<a href='#'>About</a>
<a href='#'>Privacy Policy</a>
<a href='#'>Hiring</a>
Simply replace # with your links.
To add more menu items, simply add this line -
<a href='#'>More</a>
2) header i.e BlogTitle/Logo
Simply go to Page Header Gadget in Layout and add your blog title or upload your logo.
3) Header_Ad
This templates comes with a responsive header adsense slot on the right of blog title. To make use of responsive adsense ad slot, follow the below steps,
(1) Go to your Adsense Account
(2) Choose +New Ad Unit
(3) In The Ad Size Drop Down choose Responsive Ad Unit
(4) Copy the code you get
(5) Now, go to your blog Layout section and add the code you got from adsense to html widget on the top right corner of your screen.
It will automatically resize and serve a different dimension ad when you view on diffrent screen resolution.
4) Main_Menu
One of the best feature of this theme is the Ajax powered responsive Mega Menu. You simply add your blog label links and it shows 5 latest posts from them when the user hovers(mouseover) on that label link. Loading posts this way helps your blog load faster because it loads posts only if needed.
Click the Edit link in your Main Menu Widget. You will find this code -
    <li> <a href='https://storymagdemo.blogspot.com'>HOME</a> </li>

    <li> <a href='#'>AFRICA</a> <ul>
    <li><a href='https://storymagdemo.blogspot.com/search/label/Brexit'>Brexit</a></li>
    Politics
    <li><a href='https://storymagdemo.blogspot.com/search/label/Sport'>Sports</a></li>
    </ul></li>

    <li> <a href='#'>CULTURE</a> <ul>
    <li><a href='https://storymagdemo.blogspot.com/search/label/Politics'>Politics</a></li>
    <li><a href='https://storymagdemo.blogspot.com/search/label/America'>America</a></li>
    </ul> </li>

    <li> <a href='#'>POLITICS</a> <ul>
    <li><a href='https://storymagdemo.blogspot.com/search/label/Fashion'>Fashion</a></li>
    <li><a href='https://storymagdemo.blogspot.com/search/label/Brexit'>Brexit</a></li>
    <li><a href='https://storymagdemo.blogspot.com/search/label/games'>Games</a></li>
    </ul> </li>

    <li class='nomega'> <a href='#'>SPORTS</a> <ul>
    <li><a href='https://storymagdemo.blogspot.com/search/label/America'>America</a></li>
    <li><a href='https://storymagdemo.blogspot.com/search/label/Fashion'>Fashion</a></li>
    <li><a href='https://storymagdemo.blogspot.com/search/label/Politics'>Politics</a></li>
    </ul> </li>

    <li id='hot'> <a href='https://storymagboxed.blogspot.com'>BOXED</a> </li>

    <li> <a href='https://storymagdemo.blogspot.com/p/reviews.html'>REVIEWS</a> </li>
Code in yellow color represents 1 item in a menu.
<li><a href='http://slashdemo.blogspot.com/search/label/something'>SomeText</a></li>
You just have to replace the red text with your full label link and yellow text with the title that appear for that link. To add more submenu items, simply keep adding the above code.
If you want a simple submenu without posts, simply add the red code in li tag. Remember the space before the red code.
If you want to add hot tag to your menu. Add the green code in li tag. Again remember to add space. Also supports id='new' for showing new instead of hot.
Save your widget after making the required changes. If you are facing any problem in creating your mega menu, just send me an email with the menu structure you want. And i will send you the codes to add.
5) Hidden_Menu
Click the edit link on Hidden Menu widget. In the Content box, you will find this code.
<div dir='ltr' style='text-align: left;' trbidi='on'>
<ul>


<li><a href='#'>Politics</a>

<ul>

<li><a
href='#'>Leadership</a></li>

<li><a
href='#'>History</a></li>

<li><a
href='#'>Locations</a></li>


</li>


<li><a href='#'>India</a>

<ul>

<li><a
href='#'>Hyderabad</a></li>

<li><a
href='#'>Masters</a></li>

<li><a
href='#'>Internets</a></li>


</li>


<li><a href='#'>Sports</a>

<ul>

<li><a
href='#'>Adventure</a></li>

<li><a
href='#'>Masters</a></li>

<li><a
href='#'>Football</a></li>


</li>


<li><a href='#'>France</a>

<ul>

<li><a
href='#'>Varseles</a></li>

<li><a
href='#'>Masters</a></li>

<li><a
href='#'>Internets</a></li>


<span style='color: #ffe599;'>
</ul></span>

</li>


<li><a href='#'>Europe</a>

<ul>

<li><a
href='#'>Brexit Law</a></li>

<li><a
href='#'>Masters</a></li>

<li><a
href='#'>Historians</a></li>


</li>


<li><a href='#'>Britian</a>

<ul>

<li><a
href='#'>London</a></li>

<li><a
href='#'>Masters</a></li>


</li>


</ul></div>
Replace # with Menu link.
Single menu item looks like this -
<li><a href='#'>Hyderabad</a></li>
You can add more of them just before the yellow
Red colored text appears in your menu as heading in red color. Replace them with appropriate texts.
6) Trending_Posts
Popular posts widget is used to show Trending Posts. Simply open the widget and choose from the available options. Do remeber to untick snippet option.
7) Social_Icons
Click Edit on Social Icons widget, in Content box, you will find this code -
<a href='#'><span style='color: #ffe599;'><i class='fab
fa-twitter'/></i></span></a>
<a href='#'><span style='color: #ffe599;'><i
class='fab fa-facebook'/></i></span></a>
<a href='#'></a>
<a
href='#'></a>
Replace yellow color with your favourite social icon from here - All Icons Code
Simply visit the icons site, then click on the icon you want and copy the HTML you see.
Replace # with social media page link.
(C) Featured Posts
Back To TopFeatured Posts
Open the Featured_Posts Widget. You will find this code -
<script type='text/javascript' src='/feeds/posts/default/-/featured?published&alt=json-in-script&callback=labelthumbsoo'></script>
Replace red color label name with your own. Then simply Save the widget.
(D) PostPage Slider
Back To TopOpen AbovePostTitle_Slider widget, you will find this code -
<script type='text/javascript'>var postcount = 11;</script>
<script type='text/javascript' src='/feeds/posts/default/-/Famous?published&alt=json-in-script&callback=labelthumbo'></script>
Replace 11 with number of posts you want to show. It is recommended to not use a number less than 11 as it will not consume full width on larger desktop screens.
To show posts by label, replace red color label name with your own.
If, instead of posts by label, you want to show all the latest posts remove both green and red text. It will look like - /feeds/posts/default/?published
Then simply Save the widget.
If you want to show post titles below the image. Here's how to do it. First Backup your template.
Go to Themes. Then click on the arrow beside Customize. Then Click on Edit HTML. Then Click anywhere in the code and then Press CTRL+F to bring search box. Type class='wrapin'> and hit Enter. You will see this code -
<div class='wrapin'>
Then Save the Theme
(E) Popular Tabs
Back To TopTo change the heading 'Popular', see Theme Designer section.
(F) Tabbed Section
Back To TopFor example, if you add this to your widget-
It will be displayed as -
Just remember that labels are case sensitive. So, nature, Nature and NATURE are three different labels.
Video Section has no tabs. So you simply add a single label name in your widget.
(G) Sidebar
Back To Top1) Social Media Boxes
Now, let's start by setting up our social media boxes with social icons and links. Open any 'HTML/JavaScript' widget and paste the below code -
<div class='sicon'><a href='#'><i class='fab fa-facebook-f'></i><span>12,740 Likes</span></a></div>
<div
class='sicon'><a href='#'><i class='fab fa-pinterest-p'></i><span>5,600 Fans</span></a></div>
<div
class='sicon'><a href='#'><i class='fab fa-twitter'></i><span><span style='color: #b6d7a8;'>340
Followers</span></span></a></div>
<div class='sicon'><a href='#'><i class='<span style='color: #ffe599;'>fab
fa-instagram</span>'></i><span><span style='color: #b6d7a8;'>1360
Followers</span></span></a></div>
Simply replace yellow color with your social media icon. Visit FontAwesome to pick your icon.
Replace green color with your text. Replace # with respective social media links.
You can change colors through Theme Designer.
2) Follow By Email
Since google has shutdown the feedburner's subscribe by email service, we have to use another service for sending our email. The best so far is follow.it
To use this service, signup at follow.it then under 'Publishing' select 'Add Feed', then simply input your blog address and click Next
You will be presented with a signup form and the code for it. You can simply copy/paste the code in any HTML/JavaScript widget. But if you want the subscription widget to look like in demo, then click on the 'Already have a form?' tab and copy the code.
Now, go to your blog Layout, open the email subscription widget, you will find this code -
<div class='follow-by-email-inner'>

<form action='https://api.follow.it/subscription-form/N0JsYVNwVGYxKzBkQWJDWWMyUzQyM0tsQnpSMXo0djRGM3pIZlJxWmFwelFvSWhwSmMxUHRUSWlENTlqQXZVM0NhTmN2U0h6djRHRW95WkNQT0F2eDljVmUxVUNsLzhnOVBTelJ3aEtaTytFcDUzSTkyQnNkQjZ4L1VxVC9JSFN8NnhRanVxUTRRZHdBYVYyV2xDWnJTaUR0YUJZVG55Ni9LN1RPOTgxNm5mWT0=/8' method='post'>

        <table width='100%'>
          <tbody><tr>
            <td>
              <input class='follow-by-email-address' name='email' placeholder='Email Address...' type='text' />
            </td>
            <td width='64px'>
              <input class='follow-by-email-submit' type='submit' value='Submit' />
            </td>
          </tr>
        </tbody></table>
      </form>
    </div>
Now, simply replace the red color with the follow.it code you copied. Then Save the widget.
Remember to not add title to your email subscription widget. It is already added and you can change it from (I) Changing Text, Translation and RTL Section
3) Single Post Slider
Open the widget in SliderPosts_allPages section. Now, add labels seperated by comma like in Tabbed Section. Post from first label will be displayed and all labels will be displayed as dropdown menu.
4) Tabbed Widget
Inside MultiTab_allExceptHomepage section, we have our widgets that are shown as tabs. You can add upto 2 widgets in this section.
It's not limited to latest and popular widget. You can add any other widgets you want. You can also change order of tabs in your blog by simply rearranging the placement of your widget in your layout.
If you want to add posts by label on the first tab, open your 'HTML/JavaScript' widget or add a new one and in the content box paste this -
<div class='a'>Brexit, 5</div>
<div class='a'>latest, 5</div>
If you want to add posts by label on your second tab too, open your 'HTML/JavaScript' widget and in the content box paste this -
<div class='b'>Brexit, 5</div>
Same just b instead of a.
(H) Posts and Comments
Back To TopButtons
If you want to add buttons to blog posts, we have already added many button styles for you. You need to simply go to 'HTML View' in your post editor and paste one line of code. And your button will show up on your post.
Here's all the button styles -
To add the first button, in your 'HTML View', paste the following code -
<button class='button-1' type='button'>Button 1</button>
Green color is the button text.
Red color is the style name. They are in order like button-1, button-2, buttom-3 ...... button-12, button-13 .... button-17
Adding Links To Button
To add links to your button, simply add onclick='location.href='https://www.google.com'' after type='button'<button class='button-6' type='button' onclick='location.href='https://www.google.com''>Button 1</button>
For opening links in new tab, use
<button class='button-6' type='button' onclick='window.open('https://www.google.com','_blank');'>Button 1</button>
Center the Button
If you want the button to appear in the middle, simply add center to button class. Like this -<button class='button-5 center' type='button'>Visit Us</button>
It will appear in the center of the page. Note the space between button style name and center.
Adding Icons to Buttons
All the supported icons can be found here - https://fontawesome.com/v5.15/iconsSimply find the icon you need, then click it to open that icons page, there you will find the icon code. It will look like this -
To add an icon to button, simply add the icon code before green text. For example, if we want to create a buy now button with cart icon and style 12. We do this -
<button class='button-12' type='button'><i class='fa fa-shopping-cart'/></i>
Buy Now</button>
We will get this -
One last thing to note - If you want your icon to appear after the text, add the icon code after green text. You also need to add right to icon class. Like this -
<button class='button-12' type='button'>Buy Now
<i class='fab fa-twitter'/></i></button>
Keyboard Shortcuts
If you need to mention keyboard shortcuts to you post. This theme includes the styling for that. Go to 'HTML View' and paste this line of code -
Shift
You just have to surround your keyboard text with kbd tag. Note that the after kbd tag has a slash which means the tag is closed. It will look like this in your post - Shift
For multiple shortcuts like this - ⌘+Opt+Shift+V
<kbd>⌘</kbd>+<kbd>Opt</kbd>+<kbd>Shift</kbd>+<kbd>V</kbd>
Comments
With the new update you now have 4 options for your comments. You can either display blogger comment system or disqus or both. Managing comment section is pretty simple. Go to Layout, then open the 'Comment_Type' widget. Now, if you want to add only blogger comment, add this to content area -
1) To show only Blogger Comment -
blogger2) To show only Disqus Comment -
disqus, your_disqus_shortname3) To show both Blogger and Disqus Comment in tabs
both, your_disqus_shortname4) To hide the whole comment section
noneThen Save the Widget.
If you are not using blogger comment system, you will need to remove comment count on 'Latest Post' in Homepage. To do so - Go to Theme > Customize > Advanced > Latest Posts Section > Post Comment Text Color. Turn on the transparent switch to make it disappear.
To get disqus shortname. Sign up at https://disqus.com/
Click 'Get Started' or 'Install Disqus' > Then you will be asked 'what would you like to do with Disqus?'. You Choose 'I want to install Disqus on my site'
In the Next screen you will be asked to Enter your Website name, once you enter it, your short name will be generated for you. You can customize it if you want by clicking the 'Customize your url' link.
You can then choose what plan you want either free or paid. That's all you need.
There are many options for you to play around. One thing you should do if you want to comment count to appear as '2' instead of '2 comments'. Go to 'Community' section in your Disqus settings and remove the comment text.
If disqus changes it's process, don't worry. Simply signup, and follow the onscreen instruction. You will get your disqus shortname. You can also get if afterwards by going to Disqus Settings and then clicking General tab.
(I) Footer
Back To TopOn the first column i have added a logo, some text and contact options. Adding the same or customizing it is pretty easy. Open the widget and you will find this code -
<img src='https://1.bp.blogspot.com/-DRPUKTzab_o/YDpGl-GNrxI/AAAAAAAAFf4/-jSPk5wG_WISX_lq_Jt51I8RQ8x4uyFmQCLcBGAsYHQ/s16000/storymag-light.png'
/>
<span style='color: #ea9999;'>Trends is an amazing magazine Blogger theme that is easy to customize
and change to fit your needs.</span>
 <div class='flinks'>
<a href='#'>
hello@beautiful.com</a>
<a href='#'><span style='color: #ffe599;'><i class='fas
fa-headphones'></i></span> +91 60521488</a>
</div>
Replace green with your blog logo. Replace red with text below it.
Replace yellow with icons of your choice and # with respective links.
If you want to show posts by labels in your footer. Click on '+ Add a Gadget' link, then choose 'HTML/JavaScript'. In the content box of your widget, paste the below code -
<div class='recentbylabels'>
<script type='text/javascript'>var numposts = 3;</script>
<script type='text/javascript' src='/feeds/posts/default/-/sports?published&alt=json-in-script&callback=labelthumbs'></script>
</div>
Replace yellow number with number of posts.
To show posts by label, replace red color label name with your own.
If, instead of posts by label, you want to show all the latest posts remove both green and red text.
(J) Changing Text, Translation and RTL
Back To TopChange Text and Loader Image
Go to Theme. Click the arrow beside Customize. Click on Edit HTML. You will see this code after first few lines -
<Variable name='string.menu.hot' description='Menu Label Text 1' type='string' value='HOT'/>
<Variable name='string.menu.new' description='Menu Label Text 2' type='string' value='NEW'/>
<Variable name='string.loader.more' description='New Posts Loader Text' type='string' value='LOAD MORE'/>
<Variable name='string.loader.loading' description='New Posts Loading Text' type='string' value='LOADING'/>
<Variable name='string.loader.nomore' description='No More Posts Text' type='string' value='THATS IT'/>
<Variable name='string.popular.title' description='Title of Popular Section on Homepage' type='string' value='POPULAR'/>
<Variable name='string.image.subtitle' description='Image Section Subtitle' type='string' value='Must See Awarded Photos Our Team Clicked Today'/>
<Variable name='string.latest.title' description='Latest Posts Title on Homepage' type='string' value='LATEST'/>
<Variable name='subscribe.heading.text' description='Subscribe By Email Heading' type='string' value='Subscribe to Our New Stories'/>
<Variable name='string.next.story' description='Next Post Text on Post Pages' type='string' value='NEXT STORY'/>
<Variable name='string.loader.url' description='Loader Image' type='string' value='https://1.bp.blogspot.com/-5Tm0tApqBlM/YDPKgZd8AJI/AAAAAAAAFfs/1Kq3a1xhxJIbpYUL_yQ0WGlWwdlq3h4ugCLcBGAsYHQ/s16000/loader.gif'/>
Replace green color with text of your choice and red color with your loader image.
Dates
This section is only for people who want to change date language from english to any other like german, french, arabic etc.
1) To change date language in header menu at the top. Go to Theme. Click the arrow beside Customize. Click on Edit HTML. Click anywhere in the code and then Press CTRL+F to bring search box. Type 'header date start' without quotes and hit Enter. You will see this code -
/* header date start */
String.prototype.toRTLdigits= function(){
 var id= ['0','1','2','3','4','5','6','7','8','9'];
 return this.replace(/[0-9]/g, function(w){
  return id[+w]
 });
}
var newd = new Date();
var monthsNamex = ['January', 'February', 'March', 'April', 'May', 'June', 'July', 'August', 'September', 'October', 'November', 'December'];
var strDate = newd.getDate().toString().toRTLdigits() + ' ' + monthsNamex[(newd.getMonth())] + ' ' + newd.getFullYear().toString().toRTLdigits();
var topdatex = document.getElementById('topdate');
topdatex.innerHTML = strDate;
/* header date end */
Replace red with days and green with month names in your language.
2) To change post dates that are in time ago format (for example 5 days ago, 2 years ago). Again Go to Theme. Click the arrow beside Customize. Click on Edit HTML. Click anywhere in the code and then Press CTRL+F to bring search box. Type 'language pack start' without quotes and hit Enter. You will see this code -
/* language pack start */<div>
/* language pack end */</div>
Between these two lines paste your language code. Here is the list of all languages available - Languages list
Simply click on the language you want. Copy the code and paste it between the lines mentioned above.
(K) Inserting Ads in posts
Back To Top1) To insert AD below title.
Go to ‘Theme’ > Click the arrow beside ‘Customize’ > Then Click ‘Edit HTML’ > Click anywhere in the code then Press CTRL+F > In the Search box type below title and hit Enter. You will be taken to this line of code –
<!-- below title ad start -->

 <!-- below title ad end -->
Place your Ad code between these lines. Finally Save the theme.
2) To insert AD below post.
Go to ‘Theme’ > Click the arrow beside ‘Customize’ > Then Click ‘Edit HTML’ > Click anywhere in the code then Press CTRL+F > In the Search box type below article and hit Enter. You will reach this line of code –
<!-- below article ad start -->

 <!-- below article ad end -->
Place your AD code between the lines. Finally Save the theme.
(L) Theme Designer
Back To TopUnder 'Advanced', there is dropdown where you can pick what you want to change. After making the changes, press 'Save' button on the bottom right.
If you don't like the changes you have made, clicking 'clear advanced changes' link at the bottom will reset all changes back to default for that specific section. Let's say you picked 'Top Bar' from the dropdown, changed background color and saved it. Now if you want to show the default color again, simply go to the bottom in 'Top Bar' section and click 'clear advanced changes to Top Bar' and your background color will be back to default. No other changes will reset. Only the section where you click that reset link.
Notes
1) Don't use too many fonts. Fonts take time to load which will make your blog load slower. Limit them to two or three at most. Once used, you can repeat that font any number of time.
2) Menu will be displayed differently on mobile devices and smaller screens.
3) Live Preview (colors/fonts) is only available on homepage. Blogger doesn't allow for live preview of other pages. For other pages, make the changes. Save them. Then view on your blog.
(M) Sources And Credits
Back To Top- Font Awesome [version 5.13.1]
- Time Ago
- Lazy Load
- Tiny Slider [version 2.9.2]
- SlickNav Reponsive Mobile Menu
- Theia Sticky Sidebar
- Ajax Mega Menu
- Unsplash
- Google Fonts -
- Jost
- Catamaran
- Poppins
Once again, thank you so much for purchasing this theme. As I said at the beginning, I'd be glad to help you if you have any questions relating to this theme.